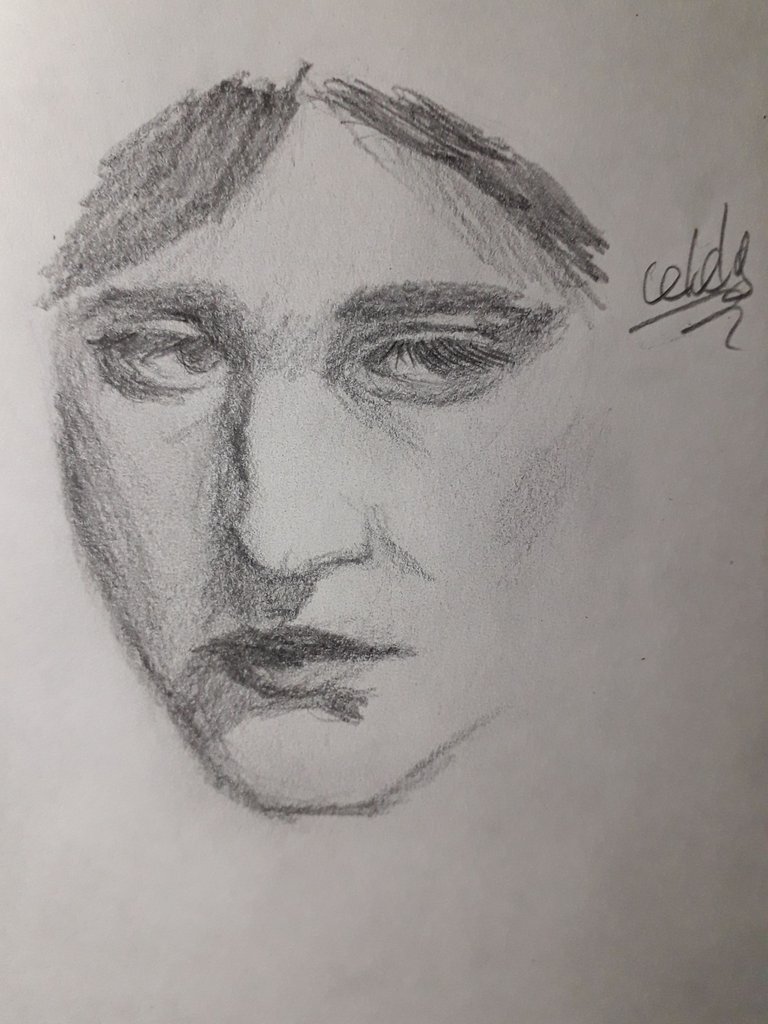
Rostro Sombrío [Esp - Eng]
Abajo les comparto el proceso de este dibujo.
Below I share with you the process of this drawing.

Español
Holiii, amigos de la comunidad de Hivearte, ¿cómo se encuentran el día de hoy?, ¡Espero que muy bien!
Hoy estoy muy feliz porque vengo a mostrarles uno de mis dibujos favoritos. Aunque pueda parecer simple, en su momento no lo fue.
En este post, verán un poco por encima como estoy aprendiendo a sombrear. Bueno, aprendí por mi cuenta, y estoy muy feliz con eso, porque hace relativamente poco, hacía dibujos que no me dejaban satisfecha nunca.
Todo con sombreado se ve mejor, no importa cuando leas esto.
En fin, este dibujo tampoco es nada del otro mundo, es solo un rostro; cuya expresión dejo a interpretación del público, jiji. Necesitaremos solo lápiz y papel, ¡y vamos allá!
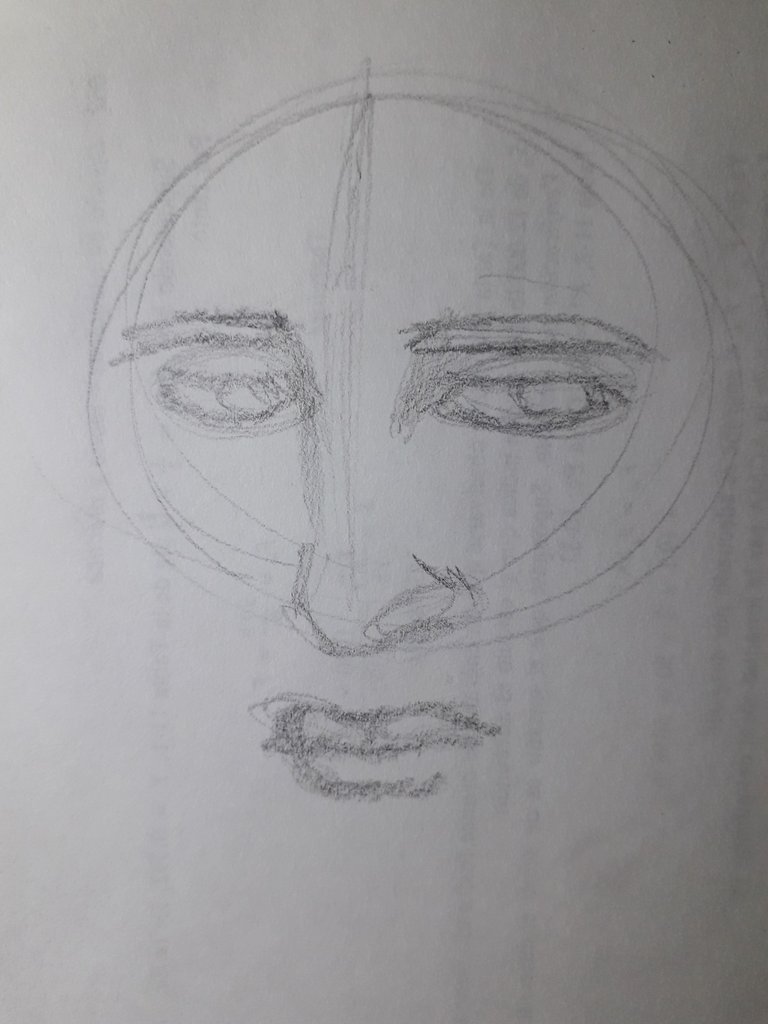
Primero comencé por hacer un círculo y partirlo a la mitad. Esa línea que lo divide a la mitad, es la línea de simetría del rostro.
Luego, utilizaré esa base como guía para dibujar los elementos del rostro. Boceteé rápidamente cada elemento; lo que más me gusta de estar practicando, es la forma en la que tomo el lápiz, con los dedos más alejados de la punta que pueda. Así es como deberían sostener su lápiz, pues te da un trazo más libre.
Mi lápiz se deslizó suavemente y dibujé los ojos con unas formas ligeramente cuadradas, con circunferencias para los iris. Las cejas las dibujé con formas rectas, prestando especial atención a la ceja izquierda, pues su forma no puede ser tan plana, ya que hay que recordar el volumen del rostro. El rostro está volteando hacia la izquierda, pero aún no dibujo su contorno. También dibujé una sombra ligera entre el ojo derecho y la nariz.
Para la nariz usé formas rectas, haciendo que esté ligeramente levantada en la punta. Me gusta esta nariz cuya forma es “puntiaguda”. No sé cómo se llama este tipo de nariz, pero me parece muy bonita. También es importante hacer la pequeña curva de la fosa nasal y luego la de la aleta de la nariz.
Por último, dibujé los labios con formas bastante curvadas, pues esta es una zona muy “redonda”, con bastante volumen; bueno, todo el rostro tiene volumen, jiji.

Lo siguiente, fue comenzar a hacer las sombras. Yo hago las sombras con trazos orientados en la dirección que siento que caen por el rostro, ¿sí me explico?
Por ejemplo, la sombra que está entre el ojo derecho y la nariz, la dibujé con trazos diagonales. El ojo con trazos horizontales hacia la derecha y el iris con trazos circulares. Importante hacer una sombra ligera para dar color al lagrimal y un trazo un poco más intenso para el pliegue del párpado superior.
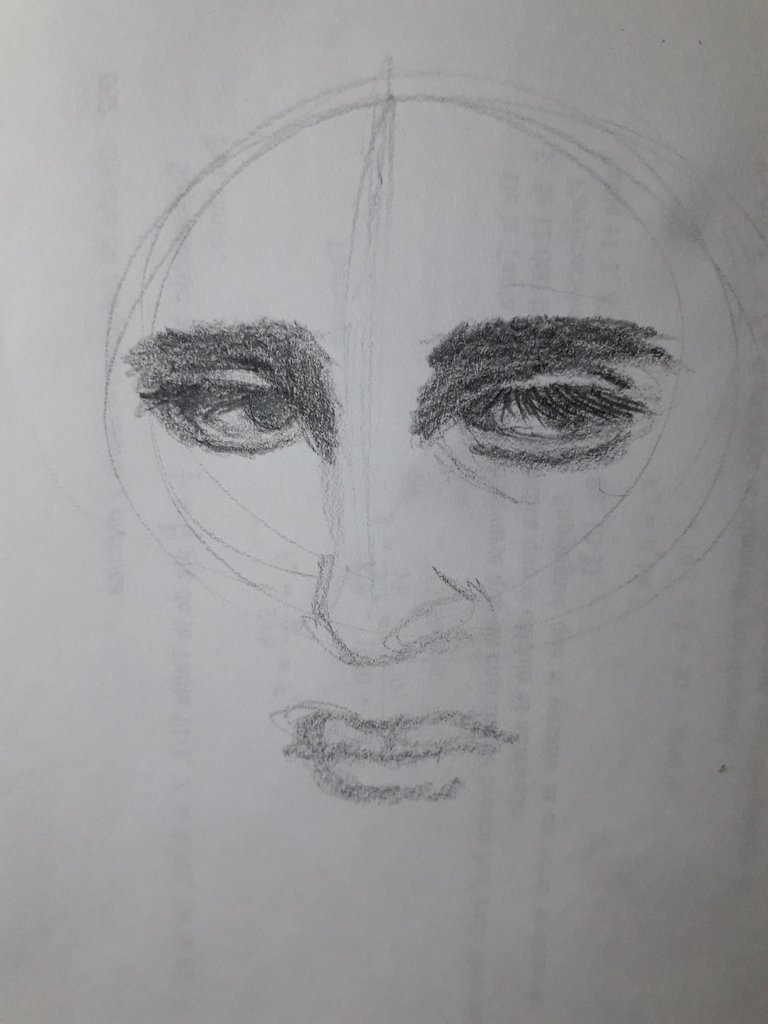
Repetí el mismo proceso con el otro ojo y después volví a dar otra capa de sombras en la zona donde eran más oscuras, logrando así mayor profundidad e intensidad. Dibujé unas pestañas con trazos muy cortos y rápidos, recordando que van a estar orientadas hacia abajo por el ángulo desde donde vemos el rostro.
Con el borrador de mi lápiz, borré el grafito ligeramente en el parpado superior y en el pliegue del parpado inferior, con la finalidad de dar luces.

Esta vez, siguen las que están proyectadas por el tabique de la nariz y la de la mejilla, que sigue más o menos la forma del rostro. Es difícil de explicar, pero solo hay que recordar que hay sombras debajo de los pómulos, cuya intensidad va a depender del contraste que exista en la iluminación. Este dibujo tiene bastante contraste como pueden ver.
Con trazos orientados hacia abajo, di más sombras en la nariz, siguiendo la forma de esta. Luego, las sombras proyectadas en la mejilla, justo al lado de la nariz, cuyos trazos serán diagonales hacia la izquierda. Luego la sombra del pómulo, la cual será diagonal orientada hacia la derecha. Yo no considero que sea buena dibujando las sombras del rostro, lo importante es saber las zonas donde se encuentran típicamente las sombras. Las sombras son mucho más complicadas de lo que uno cree, pues tienen distintas tonalidades y se dividen en varias partes, pero acá solo estoy haciendo sombras y luces simples. Es interesante que justo en las mejillas haya un “triángulo” de luz, que está presente en prácticamente cualquier ángulo, incluso tiene un nombre, pero no lo recuerdo, jijiji.
Seguí haciendo un poco más de sombra hacia el mentón, donde también tuve presente el volumen que existe. También dibujé la sombra que está proyectando la nariz, justo debajo de la base de la misma.
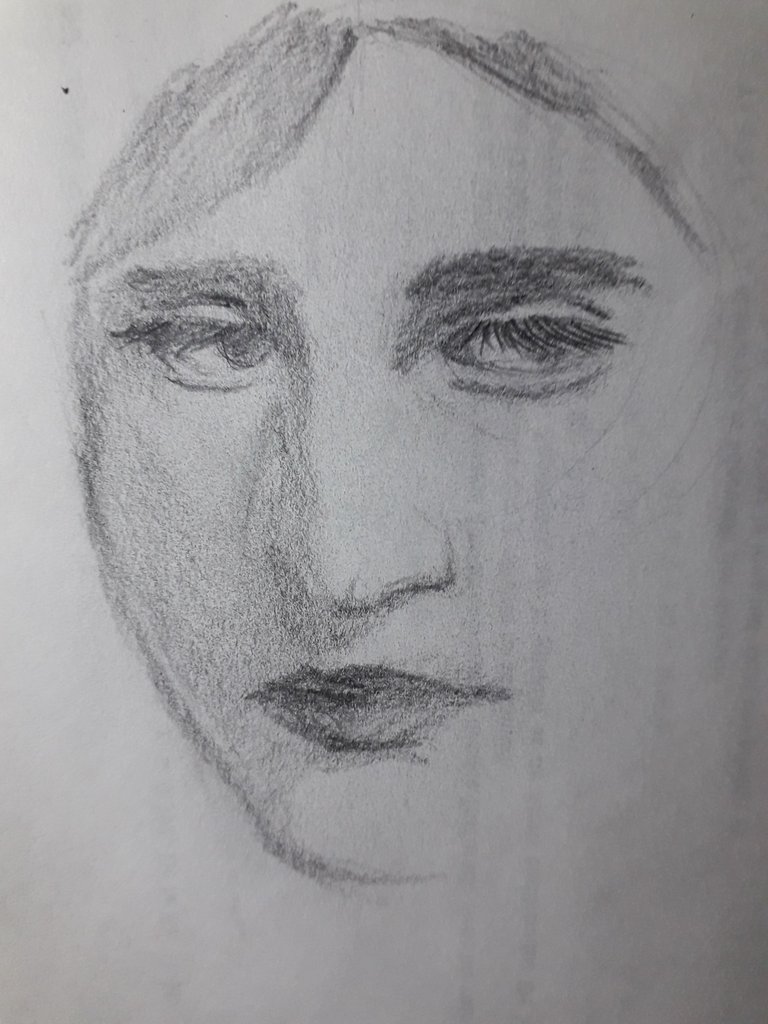
Por último, difuminé todo el dibujo con la palma de mi mano, pasándola algunas veces. Sí, lo que buscaba es que el grafito se esparciera por toda el área. Esto lo hice con la finalidad de “aclarar” los tonos de las sombras, para crear una especie de transición armoniosa entre las sombras, porque luego de esto, dibujaré más sombras en ciertas zonas puntuales.
También dibujé el contorno del rostro… Me gusta hacerlo al final porque puedo usar los elementos del rostro como guía.
También hice algunos trazos para definir el inicio del cabello.
Por último, solo me encargué de dar una capa más de sombra en ciertas zonas específicas. Como arriba del labio, en el mentón, al lado de la nariz, debajo de la base de la nariz, en los parpados y los pómulos.
Sin mencionar que oscurecí zonas como las cejas, pestañas y el inicio del cabello. También tracé ligeramente las orejas y la línea de expresión en la mejilla derecha.
Nuevamente, digo, este fue uno de mis dibujos favoritos porque logré dar una mejor profundidad a las sombras, a la vez que dibujé un rostro con un mejor acabado, comparado a mis dibujos anteriores.
Creo que una ventaja de narrar el proceso es que puedo recordar qué hice para llegar a este acabado, ¿saben?
En fin, creo que aprendimos cómo las sombras le dan más personalidad o expresividad al rostro. Yo, mientras tanto, seguiré practicando.
Sin nada más que añadir… Cuídense, tomen agua, y no se olviden de sonreír. ¡Se les quiere! Nos vemos en el próximo post, ¡chau!

English
Hi there, friends of the Hivearte community, how are you today? I hope you are doing great!
Today I'm very happy because I came to show you one of my favorite drawings. Although it may seem simple.
In this post, you will see a little above how I am learning to shade. Well, I did it on my own, and I'm very pleased with that, because relatively recently, I was making drawings that never left me satisfied. Everything with shading looks better, no matter when you read this.
Anyway, this drawing is nothing special either; it's just a face, whose expression I leave to the interpretation of the public, hehe. We'll just need pencil and paper, and here we go!
First, I started by making a circle and dividing it in half. That line that divides it in half is the line of symmetry of the face.
Then, I will use that base as a guide to draw the elements of the face. I quickly sketch each element; my favorite thing about practicing is the way I hold the pencil, with my fingers as far away from the tip as I can. This is how you should hold your pencil, as it gives you a freer stroke.
My pencil glided smoothly, and I drew the eyes with slightly square shapes, with circles for the irises. The eyebrows I drew with straight shapes, paying special attention to the left eyebrow, as its shape cannot be so flat, as you have to remember the volume of the face. The face is turning to the left, but I don't draw its contour yet. I also drew a light shadow between the right eye and the nose.
For the nose, I used straight shapes, making it slightly raised at the tip. I like this nose, whose shape is “pointy”. I don't know what this type of nose is called, but I find it very pretty. It is also important to make the small curve of the nostril and then the curve of the nose flap.
Finally, I drew the lips with quite curved shapes, because this is a very “round” area with quite a lot of volume; well, the whole face has volume, hehe.
Next, I started to make the shadows. I make the shadows with strokes oriented in the direction I feel they fall on the face, if I understand?
For example, the shadow between the right eye and the nose, I drew it with diagonal strokes. The eye with horizontal strokes to the right and the iris with circular strokes. It is important to make a light shadow to give color to the tear trough and a slightly more intense stroke for the crease of the upper eyelid.
I repeated the same process with the other eye, and then I applied another layer of shadows in the area where they were darker, thus achieving greater depth and intensity. I drew some eyelashes with very short and quick strokes, remembering that they are going to be oriented downwards because of the angle from where we see the face.
With the eraser of my pencil, I erased the graphite lightly on the upper eyelid and on the crease of the lower eyelid in order to give light.
This time, follow the ones that are projected by the septum of the nose and the one on the cheek, which more or less follows the shape of the face. It is difficult to explain, but just remember that there are shadows under the cheekbones, whose intensity will depend on the contrast in the lighting. This drawing has quite a lot of contrast, as you can see.
With downward-facing strokes, I cast more shadows on the nose, following the shape of the nose. Next, the shadows cast on the cheek, right next to the nose, whose strokes will be diagonal to the left. Then the cheekbone shadow, which will be diagonal to the right. I don't consider myself to be good at drawing the shadows on the face; the important thing is to know the areas where the shadows are typically found. Shadows are much more complicated than you might think, as they have different shades and are divided into several parts, but here I'm just doing simple shadows and highlights. It's interesting that right on the cheeks there is a “triangle” of light, which is present at practically any angle; it even has a name, but I don't remember it, hehehe.
I continued to do a little more shadow towards the chin, where I also kept in mind the volume that exists. And drew the shadow that is casting the nose, just below the base of the nose.
Finally, I blurred the whole drawing with the palm of my hand, passing it a few times. Yes, what I was looking for was to spread the graphite all over the area. I did this in order to “lighten” the tones of the shadows, to create a kind of harmonious transition between the shadows, because after this, I will draw more shadows in certain areas.
I drew the outline of the face. Furthermore, I like to do it at the end because I can use the elements of the face as a guide.
Also made some strokes to define the beginning of the hair.
Lastly, I only applied an extra layer of shadow in specific areas. Like above the lip, on the chin, on the side of the nose, under the base of the nose, on the eyelids and cheekbones.
Not to mention, I darkened areas such as the eyebrows, eyelashes, and the beginning of the hair. I also lightly traced the ears and the expression line on the right cheek.
Again, I say, this was one of my favorite drawings because I managed to give a better depth to the shadows, while drawing a face with a better finish compared to my previous drawings.
I think one advantage of narrating the process is that I can remember what I did to get to this finish, you know?
Anyway, I think we learned how the shadows give more personality or expressiveness to the face. In the meantime, I'll keep practicing.
Without anything else to add… Take care, drink water, and don't forget to smile. Love you! See you in the next post, bye!

Créditos | Credits
- English translation DeepL (sorry for any mistakes, English is my second language)
- Traducción al inglés DeepL (lo siento por cualquier error, el inglés es mi segundo idioma.)
- Separadores dibujados por mí, y banners hechos en Canva
- Dividers drew by me, and banners made in Canva
- Las fotos usadas en el post fueron tomadas por mí, usando un Samsung Galaxy J6.
- Photos used in the post were taken by me, using a Samsung Galaxy J6.
Posted Using INLEO
https://x.com/Not_Celely/status/1910742805560836255?t=gXHQ0tQZkyEMZvHRym6PWA&s=19
De verdad que hacer rostros realistas es muy complicado, te felicito por tu avance.
Bastante, por eso yo solo considero que hago semirrealismo. Muchas gracias. ❤️✨
Te quedó muy bonito, también estoy practicando rostros a lápiz, no es fácil, peor me gusta.
Muchas gracias ❤️. Muy bien, sigue practicando, ya de por si dibujas muy lindo. ✨
El dibujo realista es complicado nena y tú cada día mejoras más, sigue así. 🥰🫂
Bastante complicado. Yo la verdad tampoco quisiera lograr un hiperrealismo o realismo, con que estén bien las proporciones y se entienda, yo feliz. Muchas gracias, Sarangcita tqm 🩷🫂