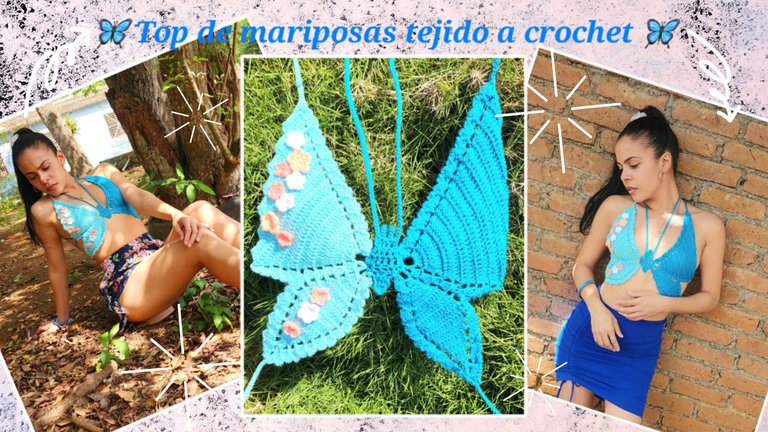
🦋 Top de mariposas tejido a crochet 🦋
Lindo y bendecido día les deseo a todos los amigos creativos de esta comunidad, del mundo entero y a todos los amantes de las manualidades. Espero y deseo como siempre que se encuentren bien, por mi parte yo me siento genial y agradecida con Dios por un nuevo despertar para mi familia y para mí.
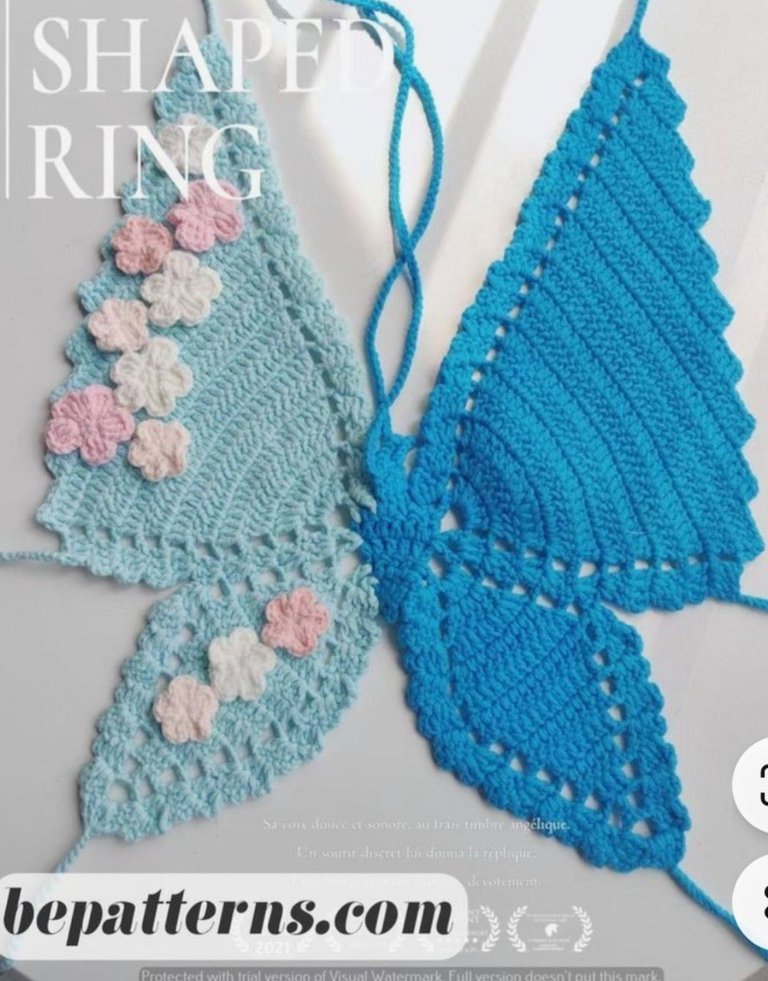
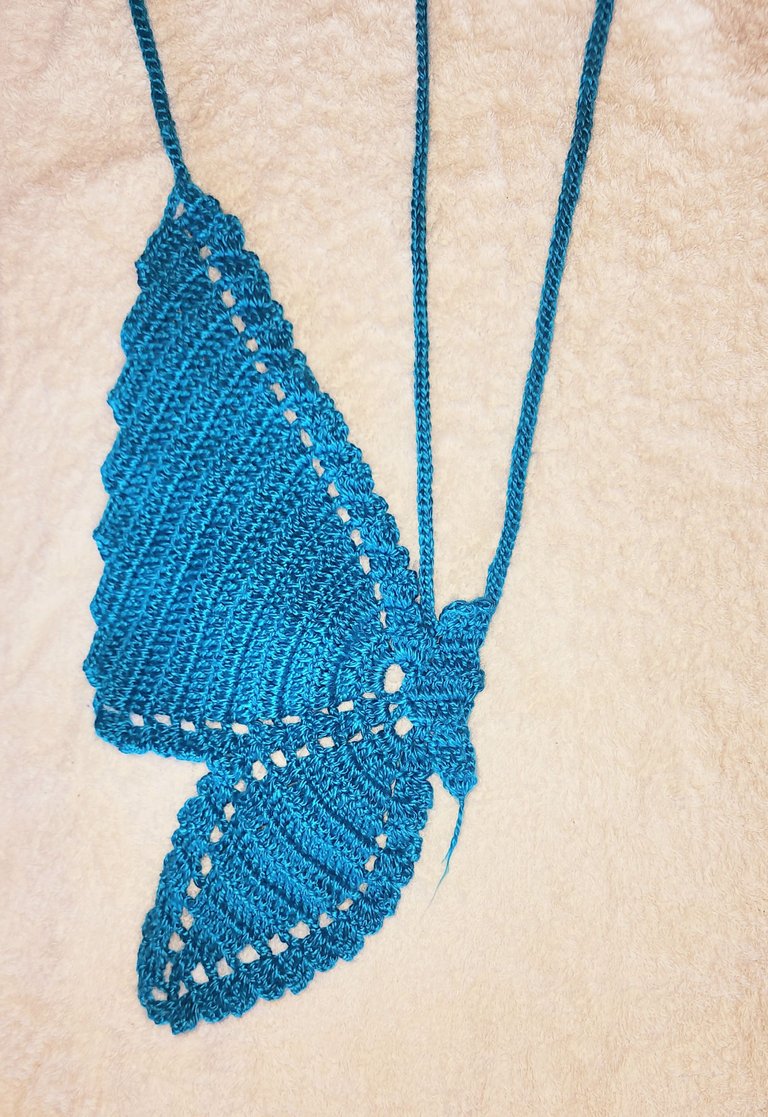
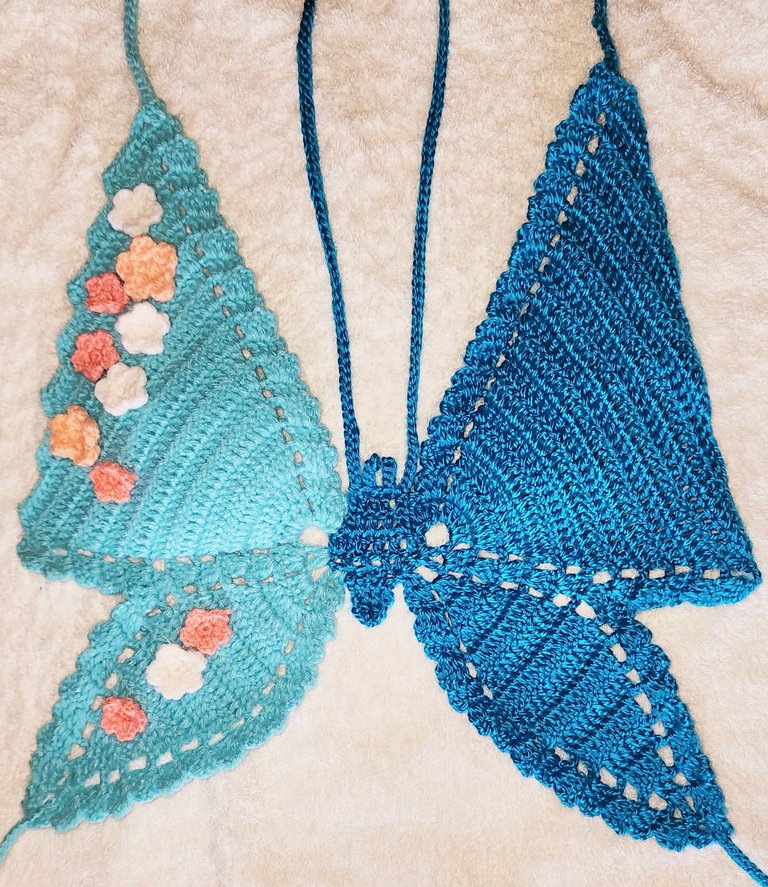
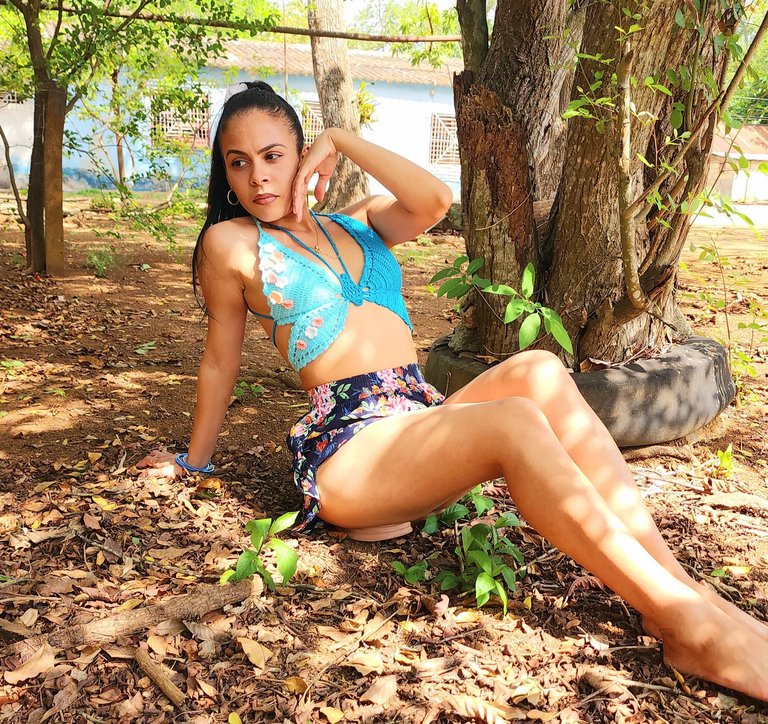
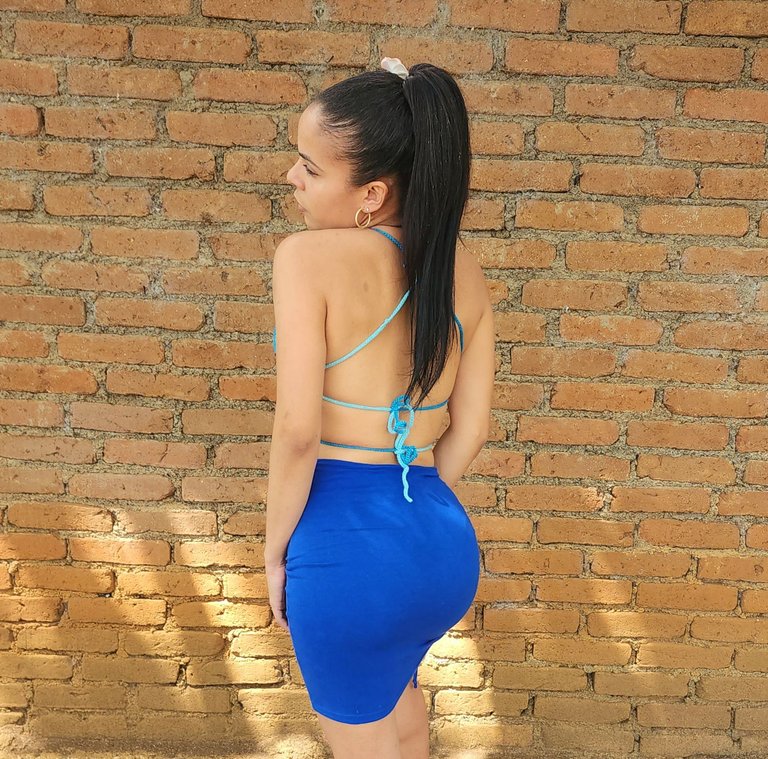
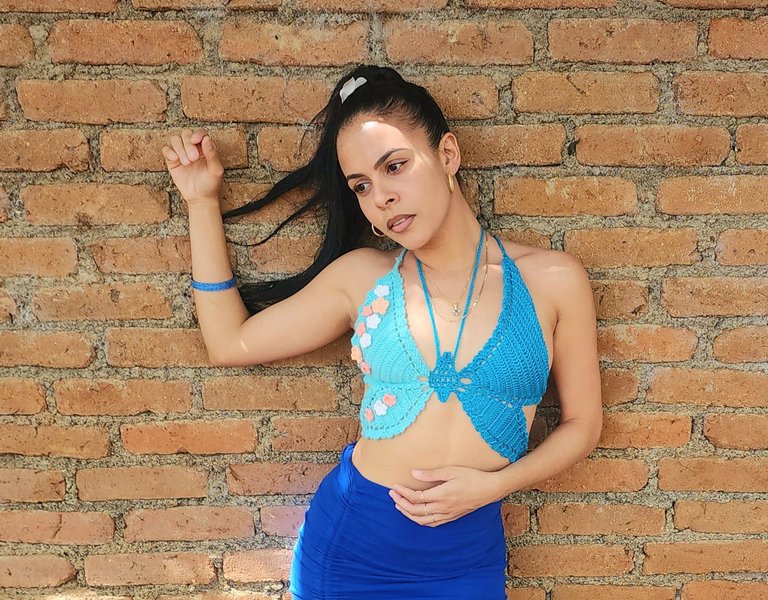
Hace unos días comencé a realizar una bonita blusa de mariposas y hoy la estuve terminando. No tenemos palabras las crocheteras para expresar lo que sentimos al ver un nuevo proyecto terminado, desbloquear algo nuevo y ver que nos ha quedado hermoso hace que sintamos sensaciones difíciles de explicar. ¡Amo estos momentos tanto! Yo, como siempre, quedé totalmente enamorada de este top, y su dueña también.
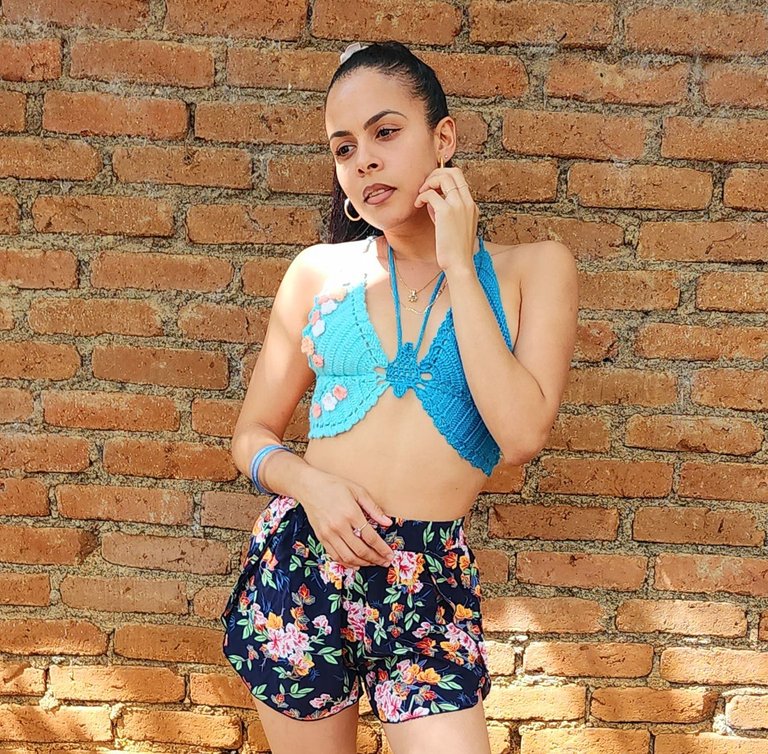
Deseo compartirles el tutorial para todo el que ame el crochet tanto como yo y desee hacerla también. Estuve utilizando dos colores porque mi clienta así la eligió y aquí les dejo la foto que ella me envió para que me digan que tan parecida me quedó a la original. Sin más, les dejo el tutorial, amigos.
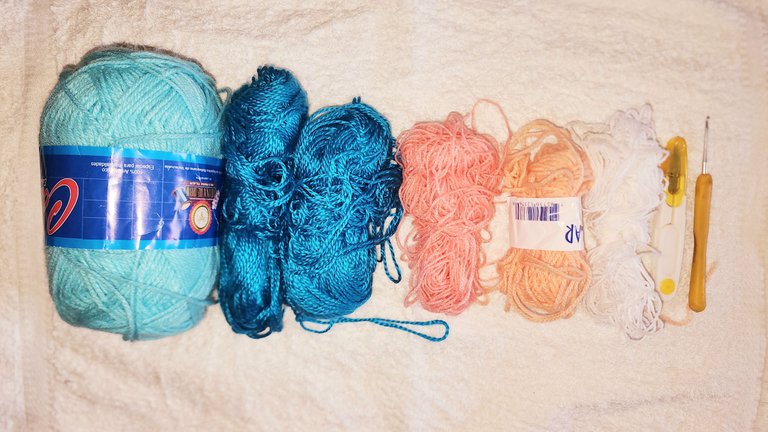
🦋 Materiales 🦋
- Lana de los colores verde azul, azul, rosa naranja, cover y blanco.
- Tijera.
- Agujeta.
🦋 Proceso 🦋
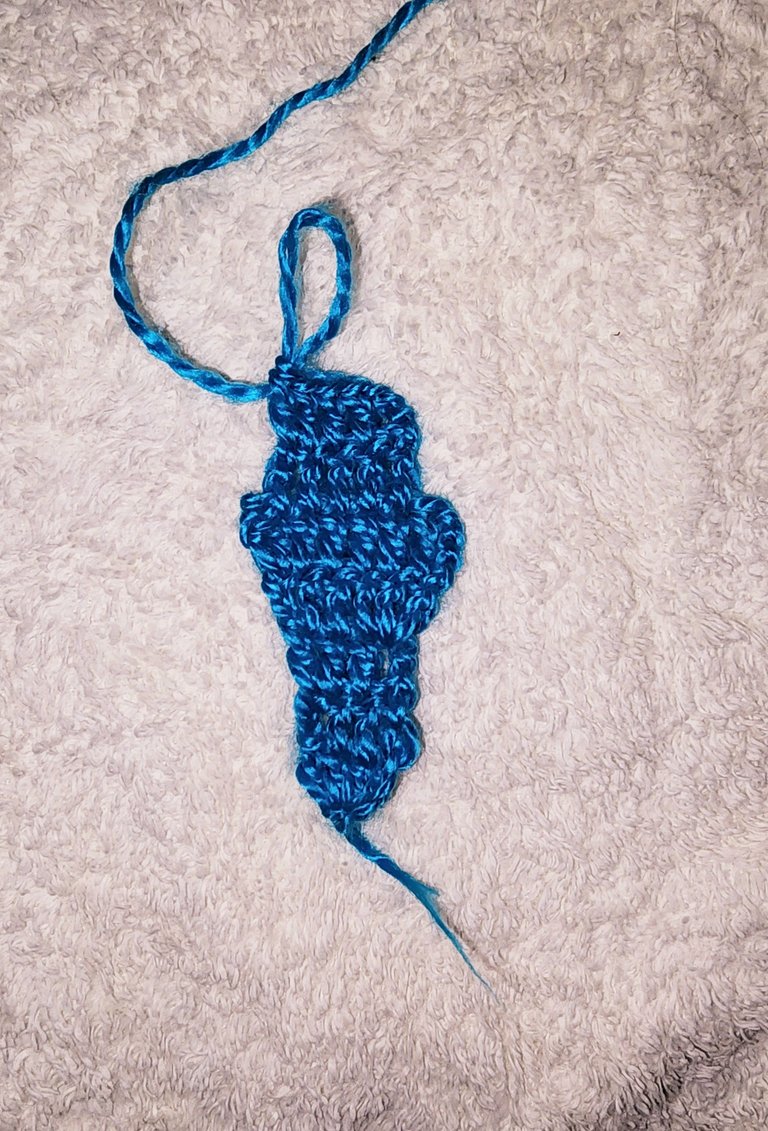
🦋 Cuerpo 🦋
V1- Comenzamos haciendo 4 cadenas, las tres primeras cadenas sería nuestro primer punto alto y en la cuarta cadena hacemos 3 puntos altos quedando un total de 4 puntos altos.
V2- Subimos tres cadenas, y realizamos tres puntos altos en los siguientes 3 puntos.
V3- Subimos cadena y vamos a mantener nuevamente estos 4 puntos altos.
V4- Hacemos 1 aumento + 2 puntos altos + 1 aumento.
V5- Hacemos 1 aumento + 4 puntos altos + 1 aumento.
V6- Giramos tejido, nos deslizamos al siguiente punto, subimos tres cadenas y hacemos 4 puntos altos en los 4 siguientes puntos, quedando un total de 5 puntos altos.
V7- Hacemos estos 5 puntos altos sin aumentos ni disminuciones.
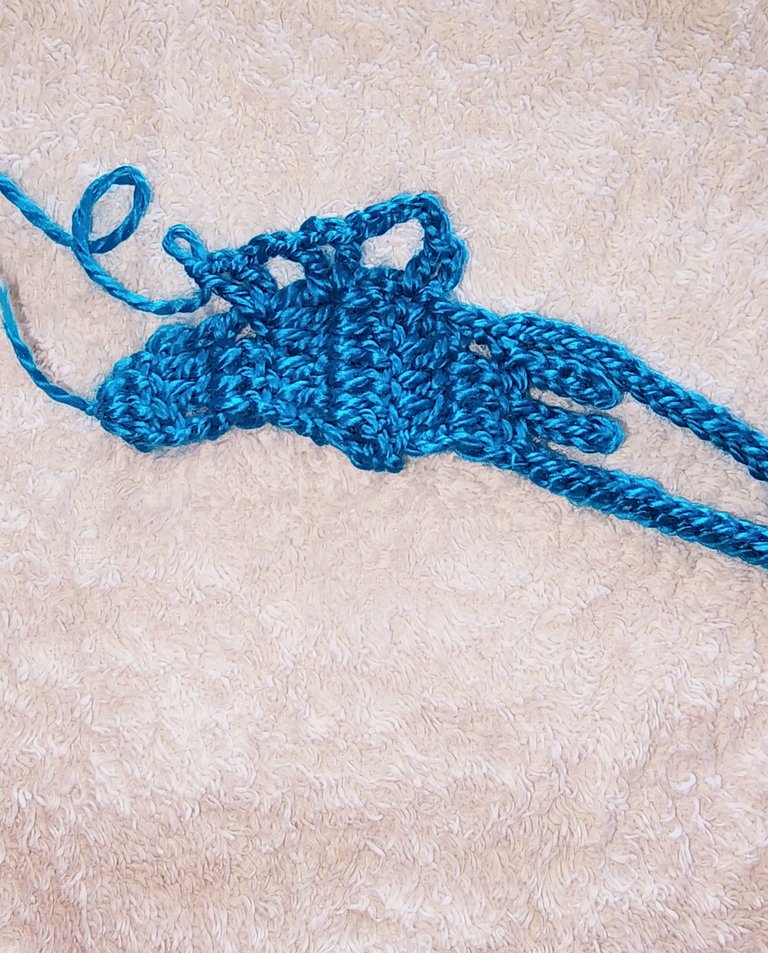
🦋 Tirantes 🦋
Giramos tejido, hacemos punto deslizado en el segundo punto y realizamos 120 cadenas, regresamos con punto deslizado hasta terminar en el mismo punto donde comenzamos las cadenas.
Nos deslizamos al siguiente punto, realizamos 5 cadenas y regresamos con punto deslizado terminando en ese mismo punto donde comenzamos.
Nos deslizamos dos puntos más, realizamos 5 cadenas y regresamos con puntos deslizados hasta el punto donde comenzamos las cadenas.
Nos deslizamos al siguiente punto y realizamos 120 cadenas, regresamos con punto deslizado hasta terminar en el mismo punto donde comenzamos.
Y terminamos realizando punto deslizado en el siguiente punto.

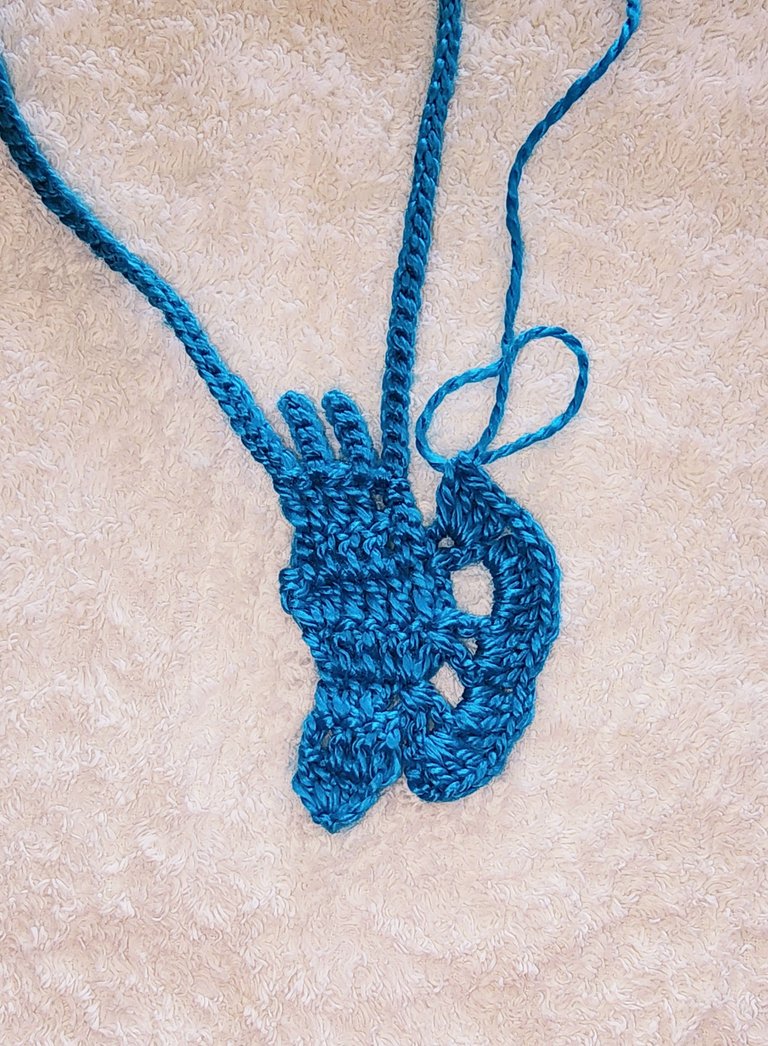
🦋 Agujeros 🦋
Vamos a deslizar hasta la unión de las vueltas 5 y 6 y ahí realizamos 3 cadenas y hacemos un punto alto en ese mismo punto donde comenzamos.
Ahora realizamos 5 cadenas y hacemos un punto alto en la unión de las vueltas 4 y 5. Hacemos dos cadenas y hacemos un punto alto en ese mismo espacio.
Ahora vamos a realizar 3 cadenas y un punto alto en el espacio donde sería la unión de las vueltas 3 y 4.
Hacemos 2 cadenas y un punto alto en ese mismo espacio.
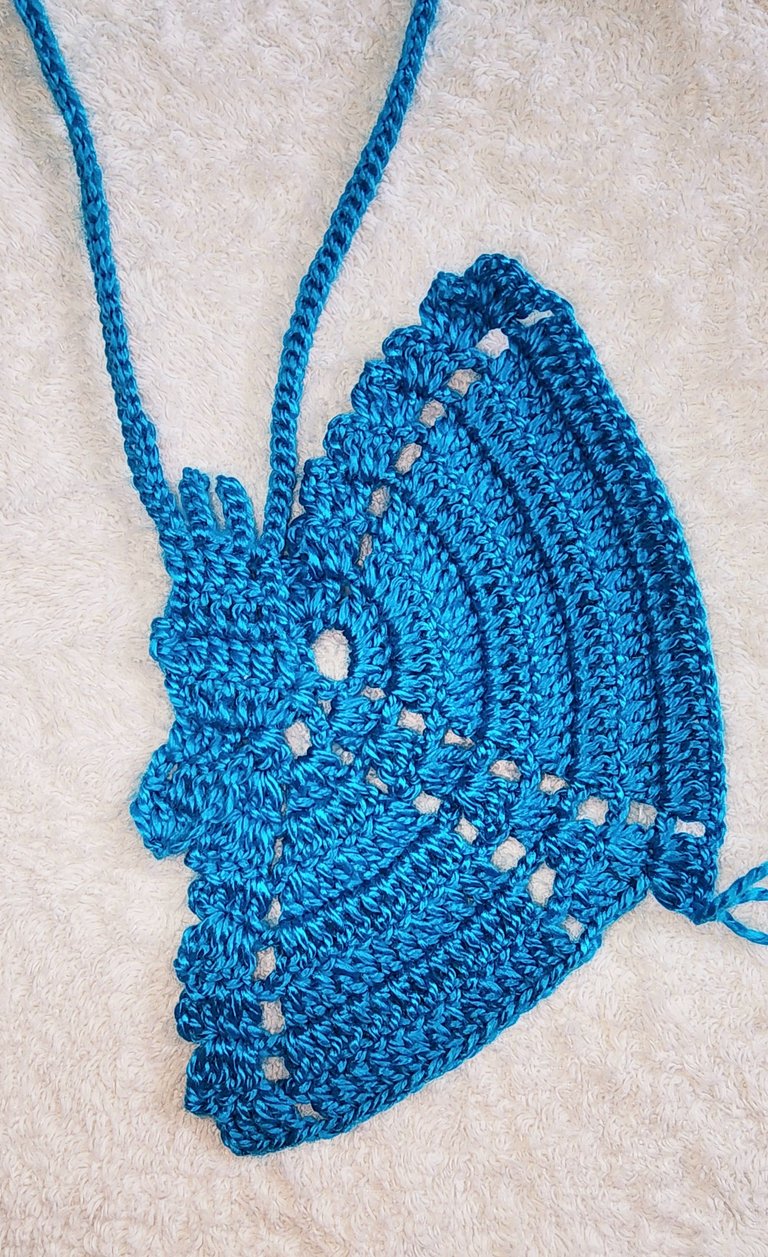
🦋 Halas 🦋
V1- Subimos 3 cadenas, giramos tejido y hacemos 3 puntos altos en el primer agujero, hago 1 cadena y en el siguiente espacio otros 3 puntos altos, 1 cadena y en el siguiente espacio 3 puntos altos nuevamente, 1 cadena y en el siguiente espacio 5 puntos altos, 1 cadena y en el último agujero 4 puntos altos.
V2- Giramos tejido y realizamos en el segundo punto, punto deslizado y en el siguiente otro punto deslizado, subimos 3 cadenas y en ese mismo punto hacemos un punto alto y en el siguiente punto dos puntos altos + 2 cadenas + 5 aumentos en los siguientes 5 puntos + 2 cadenas + 3 puntos altos en el segundo punto de los tres que tenemos, el primero y el último se quedan sin tejer + 2 cadenas + 3 aumentos en los próximos 3 puntos + 2 cadenas + 2 aumentos en los dos siguientes puntos y los dos últimos se quedan sin tejer.
V3- Giramos tejido y hacemos nuevamente puntos deslizados en el segundo y tercer punto, subimos 3 cadenas y hacemos dos aumentos en los dos primeros puntos + 2 cadenas + 1 aumento + 1 punto alto+ 1 aumento + 1 punto alto + 1 aumento + 1 punto alto + 2 cadenas + tres puntos altos en el punto del medio + 2 cadenas + la secuencia de 1 aumento + 1 punto alto por 5 veces + 2 cadenas + 2 aumentos en los primeros 2 puntos.
V4- Giramos tejido, hacemos 2 puntos deslizados en los 2 primeros puntos, subimos 3 cadenas y en los dos primeros puntos hacemos 2 aumentos + 2 cadenas + 1 aumento en el primer punto, en todos los demás 1 punto alto sobre cada punto alto y en el último 1 aumento + 2 cadenas + tres puntos altos en el punto del medio + 2 cadenas + 1 aumento en el primer punto + 1 punto alto en cada punto y en el último punto 1 aumento + 2 cadenas + 2 aumentos en los dos primeros puntos.
V5- V6- Haremos el mismo proceso de la vuelta anterior.
V7- Giramos tejido, deslizamos en los dos primeros puntos, subimos 3 cadenas, hacemos 2 aumentos en los dos primeros puntos + 2 cadenas + 1 punto alto en cada punto alto + 2 cadenas + 3 puntos altos en el primer punto y tres puntos altos en el tercero, el del medio lo dejamos sin tejer + 2 cadenas + 1 aumento en el primer punto, en todos los demás 1 punto alto sobre cada punto alto y en el último 1 aumento + 2 cadenas + 1 aumento en los dos primeros puntos.
V8- Giramos tejido, deslizamos en los dos primeros puntos, subimos 3 cadenas, hacemos 2 aumentos en los dos primeros puntos + 2 cadenas + 1 aumento en el primer punto, 1 punto alto sobre cada punto alto + 1 aumento en el último punto + 2 cadenas + 2 aumentos en los 2 primeros puntos y aquí nos vamos a devolver porque ya separaremos las halas.
V9- Giramos tejido, deslizamos en los dos primeros puntos, subimos 3 cadenas, hacemos 2 aumentos en los dos primeros puntos + 2 cadenas + 1 aumento en el primer punto, 1 punto alto sobre cada punto alto + 1 aumento en el último punto + 2 cadenas + aumentos en los dos primeros puntos.
V10- V11- Vamos a realizar el mismo proceso que en la vuelta anterior.
V12- Giramos tejido, deslizamos en los dos primeros puntos, subimos 3 cadenas, hacemos 2 aumentos en los dos primeros puntos + 2 cadenas + 1 aumento en el primer punto, 1 punto alto sobre cada punto menos el último, al llegar al último no tejemos más.
V13- Giramos tejido y deslizamos 5 puntos, subimos 3 cadenas y continuamos con puntos altos sobre cada punto alto + 1 aumento en el últimopunto + 2 cadenas + aumentos en los dos primeros puntos.
V14- Giramos tejido, deslizamos en los dos primeros puntos, subimos 3 cadenas, hacemos 2 aumentos en los dos primeros puntos + 2 cadenas + 1 aumento en el primer punto + 21 puntos altos.
V15- Giramos tejido y deslizamos 5 puntos, subimos 3 cadenas y realizamos 17 puntos altos + 1 aumento + 2 cadenas + 2 aumentos en los primeros 2 puntos.
V16- Giramos tejido, deslizamos en los dos primeros puntos, subimos 3 cadenas, hacemos 2 aumentos en los dos primeros puntos + 2 cadenas + 1 aumento en el primer punto + 13 puntos altos.
V17- Giramos tejido, deslizamos 5 puntos, subimos 3 cadenas, realizamos 8 puntos altos + 1 aumento + 2 cadenas + 2 aumentos en los dos primeros puntos.
V18- Giramos tejido, deslizamos en los dos primeros puntos, subimos 3 cadenas, hacemos 2 aumentos en los dos primeros puntos + 2 cadenas + 1 aumento en el primer punto + 5 puntos.
V19- Giramos tejido, deslizamos 5 puntos, subimos 3 cadenas, nos saltamos el espacio, tomamos lazada y realizamos en el segundo y tercero 1 punto alto en cada uno.
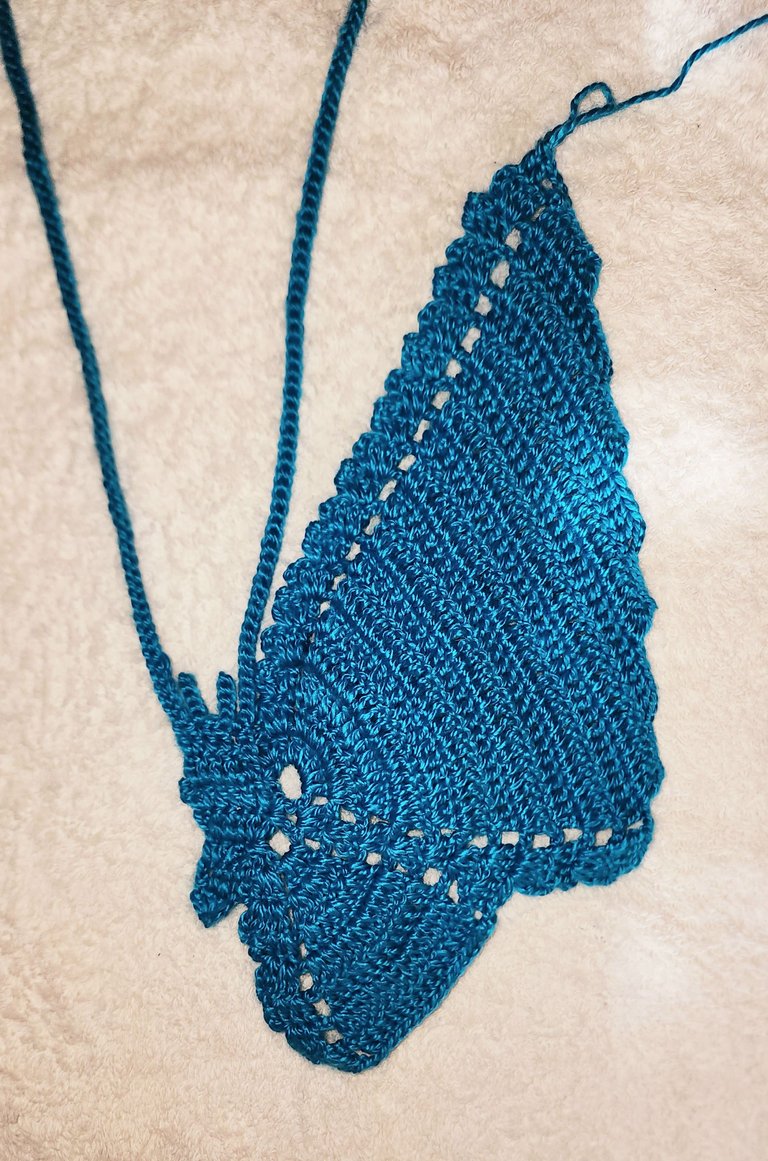
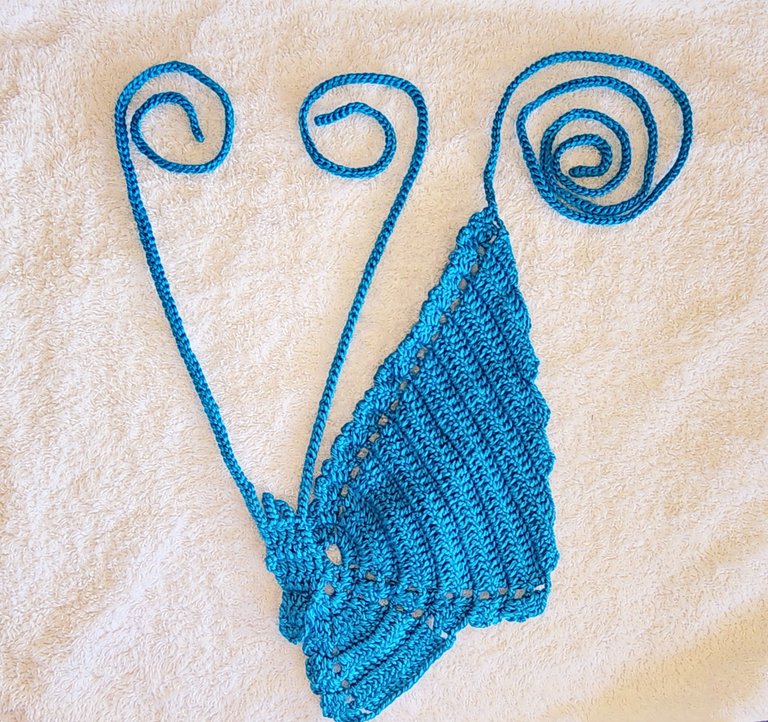
🦋 Así queda terminada esta hala. Y vamos a continuar haciendo 200 cadenas y nos devolvemos con puntos deslizados hasta el punto donde comenzamos.
🦋 Continuamos tejido la otra hala que nos habíamos quedado en la V7 donde las separamos.
V8- Nos colocamos en el segundo punto de los tres que tenemos y hacemos 1 aumento en ese punto y en el siguiente + 2 cadenas + 1 punto alto sobre cada punto pero saltándonos el primero y el último + 2 cadenas + 2 aumentos en los primeros 2 puntos.
V9- V14 - Vamos a continuar haciendo este mismo proceso hasta que nos quede 1 solo punto.
V15- Vamos a deslizamos 2 cadenas, subimos 3 cadenas, no hacemos aumentos sino que un punto alto en el siguiente punto, no hacemos cadenas, nos pasamos al otro lado y hacemos 1 punto alto en los 2 primeros puntos.
🦋 Así queda terminada esta otra hala y ahora haremos 100 cadenas y volvemos con punto deslizado hasta el punto donde comenzamos quedando así este otro tirante.
🦋 La otra parte la haremos exactamente igual cada punto a esta.

🌸 Flores 🌸
V1- Comenzamos con anillo mágico y dentro hacemos 5 puntos bajos.
V2- Subimos 2 cadenas + 1 punto alto + 1 punto medio en el mismo punto, pasamos al siguiente punto con punto deslizado y hacemos esta misma secuencia en cada punto.
Cerramos al final con punto deslizado, una cadena, cortamos hilo y escondemos.
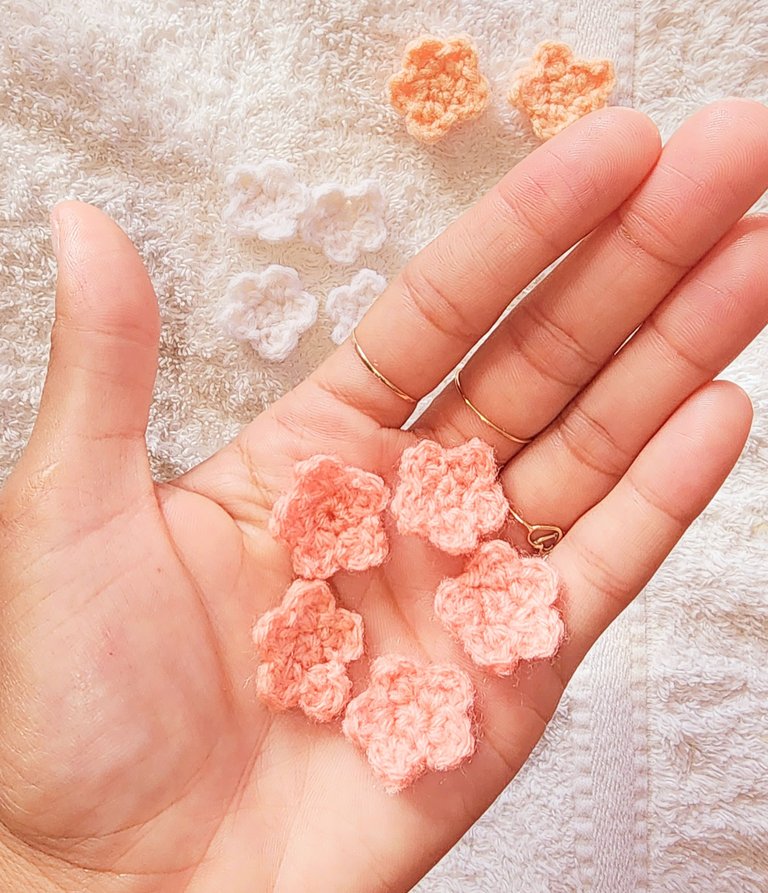
🦋 Ahora solo nos queda cocer las flores a la mariposa de la forma que más nos guste.
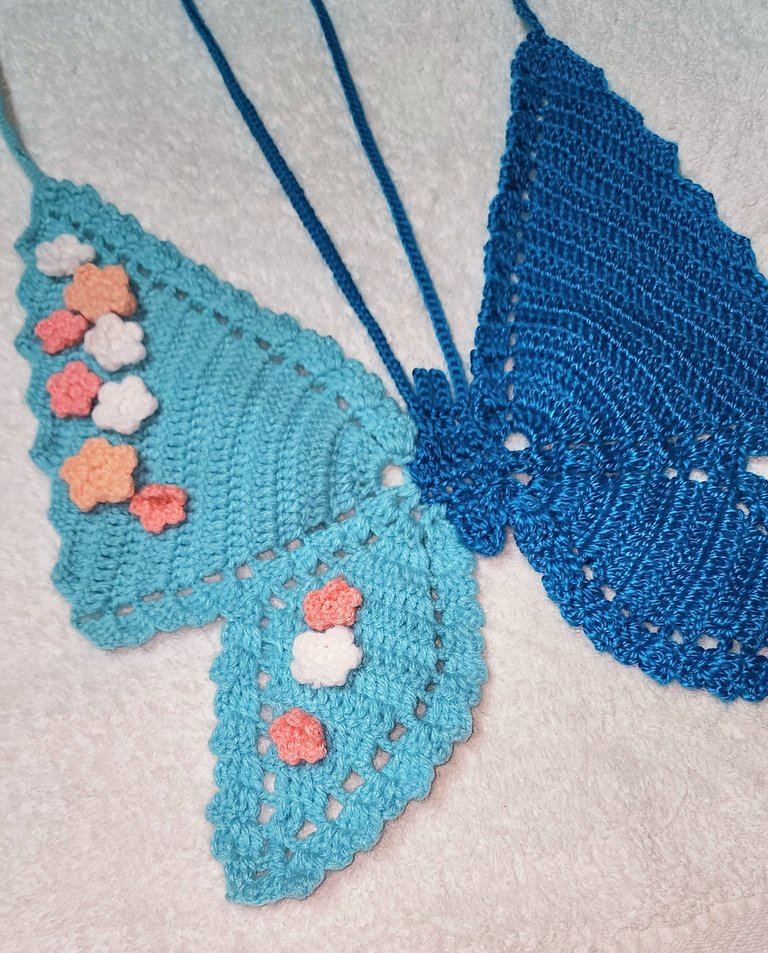
🦋 Y listo amigos así nos queda terminada esta hermosa blusa de mariposas tejida a crochet. Estoy segura que este bonito top resaltaría al lugar donde podamos ir.
🦋 Díganme si les gustó. Los leo en los comentarios. Bendiciones miles 🥰, abrazos virtuales🤗 y hasta una nueva publicación ✨️.
🦋 English 🦋
Nice and blessed day I wish all the creative friends of this community, the whole world and all the craft lovers. I hope and wish as always that you are well, for my part I feel great and grateful to God for a new awakening for my family and me.
A few days ago I started to make a beautiful butterfly blouse and today I was finishing it. We crocheters have no words to express what we feel when we see a new project finished, unlocking something new and seeing that it has turned out beautiful makes us feel sensations that are difficult to explain. I love these moments so much! I, as always, was totally in love with this top, and so was its owner.
I want to share with you the tutorial for anyone who loves crochet as much as I do and wants to make it too. I was using two colors because my client chose it that way and here is the picture she sent me so you can tell me how similar it is to the original. Without further ado, I leave you the tutorial, friends.
🦋 Materials 🦋
- Wool in the colors blue green, blue, pink orange, cover and white.
- Scissors.
- Needle.
🦋 Process 🦋
🦋 Body 🦋
V1- We start making 4 chains, the first three chains would be our first high stitch and in the fourth chain we make 3 high stitches remaining a total of 4 high stitches.
V2- We go up three chains, and we make three high stitches in the next 3 stitches.
V3- We go up chain and we are going to keep again these 4 high stitches.
V4- We make 1 increase + 2 double crochet + 1 increase.
V5- We make 1 increase + 4 double crochet + 1 increase.
V6- We turn knit, slip to the next stitch, go up three chains and make 4 double crochets in the next 4 stitches, leaving a total of 5 double crochets.
V7- We knit these 5 high stitches without increases or decreases.
🦋 Braces 🦋
We turn knit, slip stitch in the second stitch and knit 120 chains, we return with slip stitch until we finish in the same stitch where we started the chains.
We slip to the next stitch, knit 5 chains and return with slip stitch ending in the same stitch where we started.
We slip two more stitches, knit 5 chains and return with slipped stitches to the point where we started the chains.
We slip to the next stitch and knit 120 chains, returning with slip stitch until we finish in the same stitch where we started.
And we finish by performing slipped stitch in the next stitch.
🦋 Holes 🦋
Let's slip to the junction of loops 5 and 6 and there we make 3 chains and knit a double crochet in the same stitch where we started.
Now we make 5 chains and make a high stitch at the junction of loops 4 and 5. We make two chains and make a high stitch in that same space.
Now we are going to make 3 chains and a single crochet in the space where purl rows 3 and 4 meet.
We make 2 chains and a single crochet in the same space.
🦋 Halas 🦋
V1- We go up 3 chains, turn knitting and make 3 high stitches in the first hole, make 1 chain and in the next space another 3 high stitches, 1 chain and in the next space 3 high stitches again, 1 chain and in the next space 5 high stitches, 1 chain and in the last hole 4 high stitches.
V2- We turn knitting and make in the second stitch, slip stitch and in the next stitch another slip stitch, we go up 3 chains and in that same stitch we make a high stitch and in the next stitch two high stitches + 2 chains + 5 increases in the next 5 stitches + 2 chains + 3 high stitches in the second stitch of the three we have, the first and last stitches remain without knitting + 2 chains + 3 increases in the next 3 stitches + 2 chains + 2 increases in the next two stitches and the last two stitches remain without knitting.
V3- We turn knitting and knit again slipped stitches in the second and third stitches, go up 3 chains and knit 2 increases in the first two stitches + 2 chains + 1 increase + 1 increase + 1 high stitch + 1 increase + 1 high stitch + 1 increase + 1 high stitch + 1 high stitch + 2 chains + 3 high stitches in the middle stitch + 2 chains + the sequence of 1 increase + 1 high stitch for 5 times + 2 chains + 2 increases in the first 2 stitches.
V4- We turn knit, knit 2 slip stitches in the first 2 stitches, go up 3 chains and in the first two stitches we knit 2 increases + 2 chains + 1 increase in the first stitch, in all the other stitches 1 double crochet over each high stitch and in the last stitch 1 increase + 2 chains + three high stitches in the middle stitch + 2 chains + 1 increase in the first stitch + 1 high stitch in each stitch and in the last stitch 1 increase + 2 chains + 2 increases in the first two stitches.
V5- V6- We will do the same process of the previous round.
V7- We turn knit, slip in the first two stitches, go up 3 chains, make 2 increases in the first two stitches + 2 chains + 1 high stitch in each high stitch + 2 chains + 3 high stitches in the first stitch and three high stitches in the third stitch, the middle stitch we leave without knitting + 2 chains + 1 increase in the first stitch, in all the others 1 high stitch over each high stitch and in the last stitch 1 increase + 2 chains + 1 increase in the first two stitches.
V8- Turn knit, slip in the first two stitches, go up 3 chains, make 2 increases in the first two stitches + 2 chains + 1 increase in the first stitch, 1 double crochet over each double crochet + 1 increase in the last stitch + 2 chains + 2 increases in the first 2 stitches and here we are going to go back because we will separate the halas.
V9- We turn knit, slip in the first two stitches, go up 3 chains, make 2 increases in the first two stitches + 2 chains + 1 increase in the first stitch, 1 high stitch over each high stitch + 1 increase in the last stitch + 2 chains + increases in the first two stitches.
V10- V11- We are going to perform the same process as in the previous round.
V12- Turn knit, slip in the first two stitches, go up 3 chains, make 2 increases in the first two stitches + 2 chains + 1 increase in the first stitch, 1 double crochet over each stitch except the last stitch, when we reach the last stitch we do not knit any more.
V13- Turn knit and slip 5 stitches, go up 3 chains and continue with double crochet on each stitch + 1 increase in the last stitch + 2 chains + increases in the first two stitches.
V14- Turn knit, slip in the first two stitches, go up 3 chains, knit 2 increases in the first two stitches + 2 chains + 1 increase in the first stitch + 21 double crochet.
V15- Turn knit and slip 5 stitches, go up 3 chains and cast on 17 double crochets + 1 increase + 2 chains + 2 increases in the first 2 stitches.
V16- Turn knit, slip in the first two stitches, go up 3 chains, make 2 increases in the first two stitches + 2 chains + 1 increase in the first stitch + 13 double crochet.
V17- Turn knit, slip 5 stitches, go up 3 chains, knit 8 double crochets + 1 increase + 2 chains + 2 increases in the first two stitches.
V18- Turn knit, slip in the first two stitches, go up 3 chains, knit 2 increases in the first two stitches + 2 chains + 1 increase in the first stitch + 5 stitches.
V19- Turn knit, slip 5 stitches, go up 3 chains, skip the space, pick up the loop and cast on the second and third stitches 1 double crochet in each stitch.
🦋 That's the end of this loop. And we are going to continue making 200 chains and we go back with slipped stitches to the point where we started.
🦋 We continue knitting the other loop that we had left in V7 where we separate them.
V8- We place ourselves in the second stitch of the three we have and make 1 increase in that stitch and in the next stitch + 2 chains + 1 high stitch over each stitch but skipping the first and last stitch + 2 chains + 2 increases in the first 2 stitches.
V9- V14 - We are going to continue doing this same process until we have only 1 stitch left.
V15- We are going to slip 2 chains, go up 3 chains, we don't make increases but 1 high stitch in the next stitch, we don't make chains, we go over to the other side and make 1 high stitch in the first 2 stitches.
🦋 This way this other purl is finished and now we will make 100 chains and go back with slipped stitch to the point where we started, leaving this other purl.
🦋 The other part we will do exactly the same every stitch as this one.
🌸 Flowers 🌸
V1- We start with magic ring and inside we make 5 low stitches.
V2- We go up 2 chains + 1 high stitch + 1 medium stitch in the same stitch, pass to the next stitch with slipped stitch and do this same sequence in each stitch.
We close at the end with slipped stitch, one chain, cut yarn and hide.
🦋 Now we just have to sew the flowers to the butterfly in the way we like the most.
🦋 And that's it friends, this is the end of this beautiful crocheted butterfly blouse. I'm sure this pretty top would stand out wherever we can go.
🦋 Let me know if you like it. I read you in the comments. Thousand blessings 🥰, virtual hugs🤗 and until a new post ✨️.
Recursos empleados
| RECURSO / RESOURCE | FUENTE / SOURCE |
|---|---|
| Edición / Edition: | @yunacrochet |
| Imágenes / Pictures: | Samsung Galaxy s22 Ultra |
| Translated / Traducción: | Deepl Translate by @noakmilo |
Posted Using INLEO
unique👍 the shape is like a butterfly
That's right, it represents a butterfly. Blessings 🤗.
Muy bonito diseño y los colores que elegiste son muy agradables, ademas del coqueto detalle de las flores, esta muy linda 😍
Muchas gracias, tienes razón, los colores son bien bonitos y las flores le dan un toque final muy especial. Gracias y bendiciones 😘.
Awww quedó precioso😍 he visto que estos tops de mariposa están súper en tendencia, el tuyo está hermoso y ese detalle de las flores está muy femenino y delicado y da todas las vibras de hada del bosque🧚🏻♀️
Muchas gracias amiga 🤗, yo tenia muchos desees de realizar un top así y quede muy complacida con su resultado. Bendiciones y abrazos 🤗.
Amiga tienes un gran talento para crear con el arte de tejer.
Muchas gracias amiga 🤗, amo tejer. Bendiciones 🤗.
Woow felicidades amiga, el crochet no es un arte fácil, requiere de mucha paciencia y esfuerzo, quedó espectacular tu top tejido.
Muchas gracias amiga 🤗, amé realizarlo, me siento muy feliz de que les guste. Bendiciones 🤗 😘.
Amiga es un trabajo hermoso y el color me gusta mucho. Éxitos.
Muchas gracias amiga 🤗, bendiciones miles 😘
Precioso este top, es una gran habilidad la que tienes en tus manos para realizar estas hermosas creaciones.
Muchas gracias amiga, me encanta realizarlos 😁. Bendiciones miles 😘.
Demasiado hermoso 😍
Muchas gracias amiga 🤗. Bendiciones.
Hermoso. 👋❤️
Gracias 🤗
WOW! This is really beautiful and stylish, the butterfly design added gives the blouse more beauty and your creativity is truly outstanding. Nicely done and thanks for sharing your creativity with us.
Thank you so much, butterflies are so beautiful and being able to make a knitted top in the shape of butterflies was a challenge for me and I was very much in love with the result. Thousands of blessings 🤗😊.
Congratulations @yunacrochet! You have completed the following achievement on the Hive blockchain And have been rewarded with New badge(s)
Your next target is to reach 700 comments.
You can view your badges on your board and compare yourself to others in the Ranking
If you no longer want to receive notifications, reply to this comment with the word
STOPThanks you
All good @yunacrochet! You are a true inspiration for Hive! Keep going and reach your new target!
BTW, we needs your help to continue bringing gamification, entertainment, and fun to the Hive community. Our NEW proposal is waiting for your support!
All you need to do is to click on the "support" button on this page: https://peakd.com/proposals/331.
Thank you!
wow, this is super cute, it gives of an ethereal fashion vibe.. thanks for sharing.
Thanks you very much. Blessings 😘.
https://www.reddit.com/r/Brochet/comments/1l76rup/crochet_butterfly_top/
This post has been shared on Reddit by @yale95reyra through the HivePosh initiative.