Organizador de accesorios en foami. | Foam accessory organizer.
Feliz y bendecido miércoles, saludos a los miembros de la comunidad sean bienvenidos a mi blog, ya a mitad de semana y los días pasan volando, esta semana con muchas ocupaciones pero haciendo lo posible por estar aquí también, hoy me encuentro en este espacio para compartir una nueva idea en foami y sé que a muchas les puede ser útil.
Happy and blessed Wednesday, greetings to the community members, welcome to my blog. It's already midweek and the days are flying by. This week has been busy, but I'm doing my best to be here as well. Today I'm here to share a new idea on foami, and I know it may be useful to many.

En esta oportunidad realicé un organizador de accesorios en foami, ideal para guardar tus prendas como zarcillos, anillos, collares, me ha parecido una buena idea ya que a veces se pueden perder o como yo que no tenía donde guardar, ahora con esta idea suele económica y fácil de realizar será más organizado.
This time I made an accessory organizer out of foam, ideal for storing your items like earrings, rings, and necklaces. I thought it was a good idea since sometimes they can get lost or, like me, I didn't have anywhere to store them. Now, with this idea, it's usually economical and easy to make, and you'll be more organized.

Esta idea en foami la pueden encontrar en Pinterest Estuche adicional a ello realicé sus tres compartimientos, pueden decorar a su gusto y utilizar los colores que deseen, lo que más me gusta es que lleva cierre y es muy práctico, a continuación les muestro los materiales y el paso a paso.
You can find this foami idea on Pinterest Case in addition to that I made its three compartments, you can decorate it to your liking and use the colors you want, what I like most is that it has a closure and is very practical, below I show you the materials and the step by step.

| Materiales | Materials |
|---|---|
| Foami rojo escarchado | Frosted red foami |
| Foami rojo simple | Simple red foam |
| Foami blanco | White foam |
| Cierre rojo de 22 cm | 22cm red clasp |
| Cinta decorativa | decorative tape |
| Tijera, Silicón | Scissors, Silicone |
| Cartón | Cardboard |

Paso a paso / Step by step
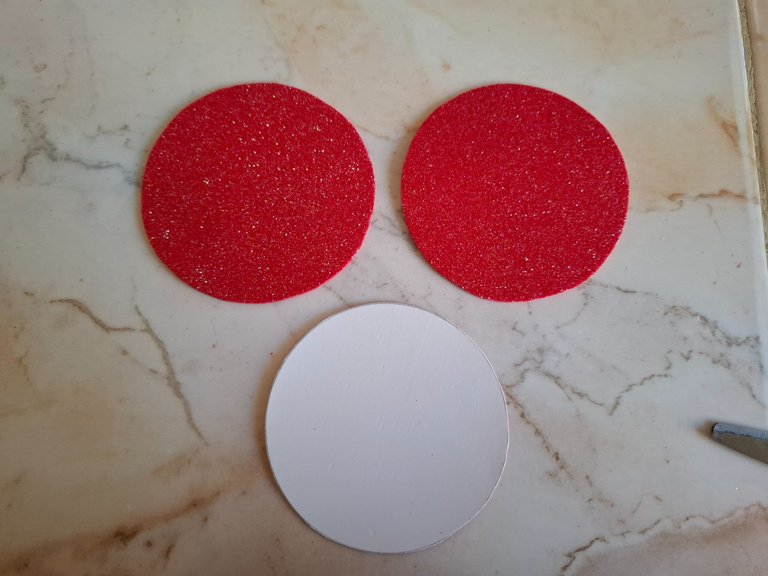
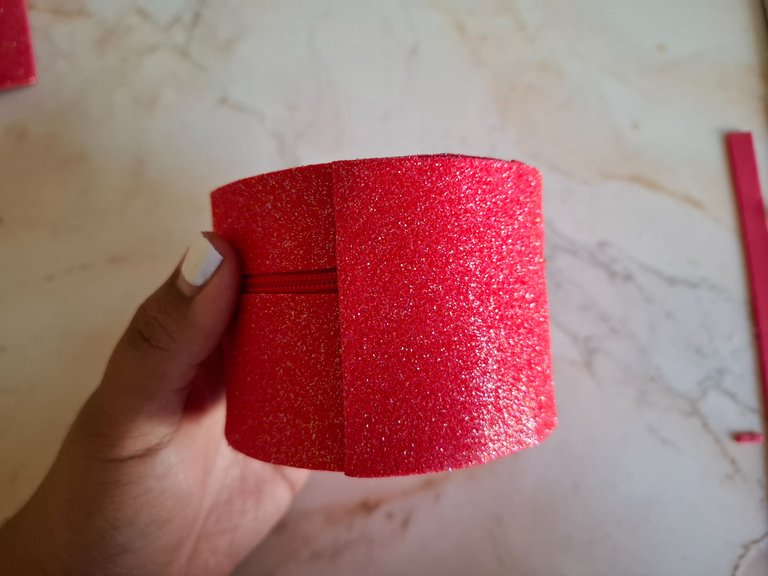
El primer paso que voy a realizar será cortar el foami rojo con una medida de 25 x 6 cm, está franja la voy a dividir en dos con una franja roja de 2 cm de ancho, la otra parte nos quedará de 4 cm.
The first step I'm going to take is to cut the red foam with a measurement of 25 x 6 cm, I'm going to divide this strip in two with a red strip of 2 cm wide, the other part will be 4 cm.
 |  |  |
|---|
Cortamos con la tijera y ya tenemos la parte superior e inferior, voy a colocar el cierre de 22 cm en el centro de ambas piensas y pegamos con silicón, ahora voy a realizar la base superior e inferior.
Para la base voy a utilizar cartón, dibujamos dos círculo en foami y cubrimos con foami rojo escarchado, el otro círculo lo cubri por ambos lados con foami rojo simple, ahora ubicamos tanto en la parte superior e inferior con silicón.
We cut with scissors and now we have the top and bottom. I'm going to place the 22 cm closure in the center of both sheets and glue it with silicone. Now I'm going to make the top and bottom bases.
For the base, I'm going to use cardboard. I drew two circles in foam and covered them with frosted red foam. I covered the other circle on both sides with plain red foam. Now, I place the top and bottom with silicone.
 |  |  |
|---|
 |  |
|---|
Para el espacio que nos queda vacío pegamos un cuadrito de foami rojo escarchado, dentro del estuche voy a realizar los compartimientos con foami blanco texturizado, utilicé este tipo porque es grueso y más resistente.
For the empty space we have left, we glue a square of frosted red foam. Inside the case I will make the compartments with textured white foam. I used this type because it is thicker and more resistant.
 |  |  |
|---|
 |  |
|---|
Ahora voy a realizar una decoración sencilla, utilizando una cinta bordada para la parte superior, en la parte inferior coloqué una cinta decorativa dorada y para el centro realicé dos flores blancas con el centro en color amarillo.
Now I'm going to make a simple decoration, using an embroidered ribbon for the top, at the bottom I placed a gold decorative ribbon and for the center I made two white flowers with a yellow center.
 |  |  |
|---|
Y de esta forma terminé este bello estuche organizador de accesorios, espero les haya gustado el resultado, muchas gracias por por visitar mi publicación nos vemos en una próxima oportunidad con más ideas creativas.
And this is how I finished this beautiful accessory organizer case. I hope you liked the result. Thank you very much for visiting my post. See you next time with more creative ideas.


Más del resultado final:
More of the final result:


Contenido original. - original content.
Los separadores y banner fueron realizados en Canva. - The dividers and banner were made in Canva.
Fotografías tomadas con mi Samsung A55. - Photographs taken with my Samsung A55.
Gif creado desde Giphy / Gif created from Giphy
Traducción de: Google traductor - Translation of: Google translator.
Posted Using INLEO
¿ᴺᵉᶜᵉˢᶦᵗᵃˢ ᴴᴮᴰ? ᵀᵉ ˡᵒ ᵖʳᵉˢᵗᵃᵐᵒˢ ᶜᵒⁿ @ruta.loans
Muchas gracias 🫂
You can make it a little bit taller, so you can put a pencils, ballpens, crayons and etc.
Nice work! @marile21
Que preciosidad de joyerito hasta un cierre le colocaste, que acabado tan prolijo e impecable ❤️
Gracias Bella 🥹✨
This is a very beautiful piece of work, so full of details, beautifully finished, and with simple, easy-to-follow steps. A very well-executed piece of jewelry.
selected by @dayadam
Thank you very much DiyHub ❤️
Esto quedó hermoso la verdad. Visto un poco de lejos y al ver los detalles, el trabajo se ve realmente como algo hermoso. Me gustó mucho la verdad.
Muchas gracias, aprecio su comentario 🫂🙏🏽
Me encantó el proceso creativo de este joyero, ideal precisamente para nuestras prendas pero para las niñas también, para que guarden sus pequeños tesoros.
Así es, gracias por el apoyo, saludos ✨
https://www.reddit.com/r/crafting/comments/1rs85r6/organizador_de_accesorios/
This post has been shared on Reddit by @marile21 through the HivePosh initiative.