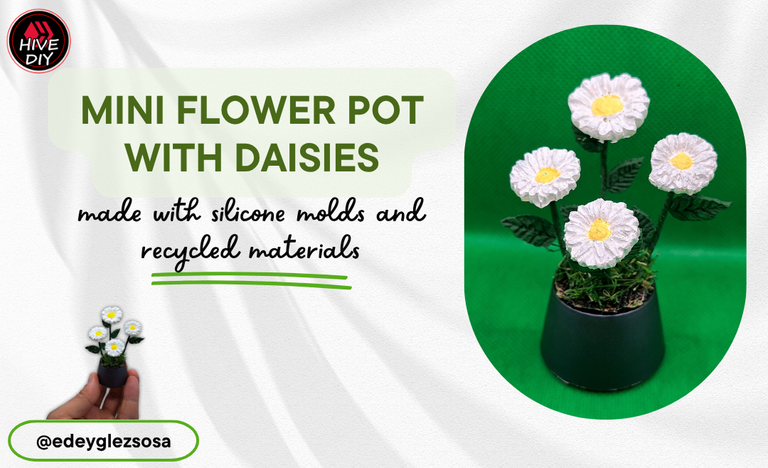
DIY: Mini flower pot with daisies made with silicone molds and recycled materials. [ENG+ESP]
Greetings, community.
I have always loved small-scale decorations, and I still do. These little wonders are easy to transport, don't take up much space, and are great for collecting, but they are a little difficult to make. At least for me.
Today I'm going to share a tutorial in which I'll show you how I made a mini daisy pot using silicone molds and recycled materials. And yes, this time I won't be using foam, which might seem a little strange, but those of you who have been following me for a while will know that I didn't use foam for my crafts at first.
To cut a long story short, I'll tell you that in this tutorial I used some silicone molds that my wife uses for her crafts with moldable foam. With these molds and a little paint, I shaped the flowers that feature in my creation today. If you're curious to know how this little ornament came to life, I invite you to read on.
Saludos, comunidad.
Siempre me han gustado los adornos a pequeña escala y siempre me gustan. Estas pequeñas maravillas son fáciles de transportar, no ocupan mucho espacio y sirven para coleccionarlos, pero son un poco difíciles de hacer. Al menos para mí.
El día de hoy les compartiré un tutorial en el cual mostraré cómo fue que confeccioné una mini maceta de margaritas hecha con moldes de silicona y materiales reciclados. Y sí, en esta ocasión no utilizaré foami, lo cual podría parecer algo extraño; pero los que me siguen desde hace tiempo sabrán que al principio no utilizaba foami para mis manualidades.
Para no alargarles mucho el cuento, les diré que en este tutorial empleé unos moldes de silicona que utiliza mi esposa para sus manualidades con fomi moldeable. Con estos moldes y un poco de pintura, di forma a las flores que protagonizan mi creación del día de hoy. Si les causa curiosidad saber cómo fue que cobró vida este pequeño adorno, los invito a seguir leyendo.
 |  |
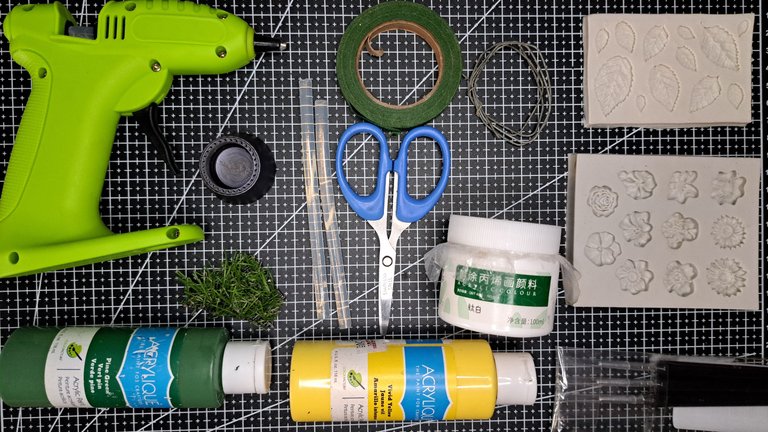
Materials // Materiales
| English | Español |
| ✔️ Silicone bars | ✔️ Barras de silicona |
| ✔️ Daisy-shaped molds and leaves | ✔️ Moldes con forma de margarita y hojas |
| ✔️ Plastic container lid | ✔️ Tapa plástica de envase |
| ✔️ Green, white, and yellow paint | ✔️ Pintura verde, blanca y amarilla |
| ✔️ Brushes | ✔️ Pinceles |
| ✔️ Wire | ✔️ Alambre |
| ✔️ Green floral ribbon | ✔️ Cinta floral verde |
| ✔️ Artificial grass clippings | ✔️ Recortes de césped artificial |
| ✔️ Scissors | ✔️ Tijeras |
Step by step // Paso a paso
1️⃣ I started working on the pot while waiting for the silicone gun to heat up. The pot will be the lid of a cream jar. I chose this one because I liked its shape and color. Inside the lid, I placed a piece of rounded polystyrene and glued a piece of artificial grass on top. I used scissors to trim the excess grass to fit the shape of the lid.
Empecé trabajando con la maceta mientras esperaba a que se calentara la pistola de silicona. La maceta será una tapa de un pomo de crema. Escogí esta porque me gustó su forma y color. Dentro de la tapa coloqué un pedazo de poliestireno redondeado y encima pegué un pedazo de césped artificial. Con unas tijeras recorté el excedente del césped para ajustarlo a la forma de la tapa.
 |  |  |
 |  |
2️⃣ Once the silicone gun was heated, I began pouring hot silicone into the molds. I created four flowers, three of which are daisy-shaped, but the fourth is a sunflower, which I will paint like a daisy so it blends in. 😅
Una vez calentó la pistola de silicona, comencé a verter silicona caliente en los moldes. Creé 4 flores, de las cuales tres tienen forma de margarita, pero la cuarta es un girasol, el cual pintaré como margarita para que pase camuflada. 😅
 |  |
 |  |
3️⃣ I did something similar with the leaf molds and created seven small leaves. I had intended to create two more large ones to attach to the pot, but the artificial grass covered the base quite well, so I decided to just make small leaves for the flower stems.
Con los moldes de las hojas hice algo similar y creé 7 hojas pequeñas. Tenía la intención de crear otras dos grandes para pegarlas a la maceta, pero el césped artificial cubría bastante la base, así que decidí producir solo hojas pequeñas para los tallos de las flores.
 |  |
4️⃣ With the help of tweezers, I managed to paint all the flowers white on both sides and then painted their centers yellow. For the leaves, I used a dark green to paint them on both sides as well.
Con la ayuda de unas pinzas, me las arreglé para pintar de blanco todas las flores por ambos lados y luego pinté de amarillo su centro. En el caso de las hojas, utilicé un verde oscuro para pintarlas también por ambos lados.
 |  |
 |  |
5️⃣ Using electrical pliers, I cut four pieces of wire approximately 15 cm long. I wrapped these wires with green floral tape. I attached the flowers to one end of the wires.
Con unas pinzas de electricidad, corté 4 alambres de aproximadamente 15 cm. Dichos alambres los envolví con cinta floral verde. En uno de los extremos de los alambres pegué las flores.
 |  |
 |  |
6️⃣ With the flowers firmly attached to their stems, I begin to stick them into the pot. Little by little, I gather the stems at the bottom and then insert them through the artificial grass. The largest flower goes at the back, then two on the sides a little lower down, and in the front a central one with some smaller ones.
Con las flores bien pegadas en sus tallos, empiezo a pegarlas dentro de la maceta. Poco a poco voy recolectando los tallos por la parte inferior para luego insertarlos a través del césped artificial. La flor más grande va detrás, luego dos a los lados un poco más bajas y en el frente un central con unas pequeñas.
 |  |
 |  |
7️⃣ Finally, I used quick-drying glue to attach the leaves to the stems of the daisies. I attached the larger leaves to the stem of the large flower and the other leaves to the stems of the other flowers.
Para finalizar, usé un pegamento de secado rápido para pegar las hojas en los tallos de las margaritas. Pegué las hojas más grandes en el tallo de la flor grande y las demás hojas en el tallo de las demás.
 |  |
 |  |
Finished Work // Trabajo Terminado
And that's all folks, this tutorial is over.
I hope you liked this little miniature decoration. For my part, I'm very happy with the result, although to be honest, I wanted it to be even smaller. For now, I'll say goodbye and wish you a happy and beautiful day.
Y bueno, colorín colorado, este tutorial ha acabado.
Espero que les haya gustado esta pequeña decoración en miniatura. Por mi parte, estoy muy satisfecho con el resultado, aunque si soy sincero, quería que fuese aún más pequeña. Por ahora, me despido deseándoles un feliz y bonito día.
 |  |
 |  |

Credits and Resources // Créditos y Recursos
Cover page created in Canva
Translated by DeepL
Images captured with my Samsung Galaxy A53


Posted Using INLEO
¿ᴺᵉᶜᵉˢᶦᵗᵃˢ ᴴᴮᴰ? ᵀᵉ ˡᵒ ᵖʳᵉˢᵗᵃᵐᵒˢ ᶜᵒⁿ @ruta.loans
Gracias por el apoyo.
WOW! It is so beautiful and charming. It looks like real one. It takes small space, so you can put it anywhere. It's good to see how you made this flower pot. Well done!
selected by @rezoanulvibes
Thanks ☺️
Really impressive
Great colour combination
Thanks, that color combination is one of my favorites.
Hermoso resultado, me encantó 😍
Muchas gracias, me alegro de que así fuese.
Que cuchitura de trabajo 💖
!discovery 30
😊
This post was shared and voted inside the discord by the curators team of discovery-it
Join our Community and follow our Curation Trail
Discovery-it is also a Witness, vote for us here
Delegate to us for passive income. Check our 80% fee-back Program
https://www.reddit.com/r/somethingimade/comments/1l32oc9/i_made_a_mini_daisy_planter_using_silicone_molds/
This post has been shared on Reddit by @edeyglezsosa through the HivePosh initiative.
The results are truly amazing, very similar to living flowers.
Thanks 🫂
You are welcome, friend.
El tamaño de este florero me parecio muy tierno 😍 a primera vista crei que era foami jaja pero no, eso es genial, te quedo muy bello 😊
Muy lindo trabajo 😍, sencillo, tierno y fácil de hacer gracias por compartir @edeyglezsosa ✨.