DIY: Framed sakura cherry blossom branch. [ENG+ESP]

Greetings, community.
Today I want to share with you another one of my creations, and this time it will be inspired by a very famous tree that can be found in the land of the rising sun. And yes, I am referring to the Japanese cherry tree or Sakura cherry tree. As a faithful follower of Japanese culture, I must admit that I love the flowers of this tree, so I decided to create this ornament as a tribute.
During the creative process, I will use both recycled materials and easily accessible craft materials, which makes this craft project easy to replicate. So, if you want to decorate your home with a small but immortal Sakura cherry branch, I invite you to follow the tutorial below.
Saludos comunidad.
Hoy quiero compartir con ustedes otra de mis creaciones y esta vez estará inspirada en un famosísimo árbol que se puede encontrar en las tierras del sol naciente. Y sí, me refiero al árbol de cerezo japonés o árbol de cerezo Sakura. Como fiel seguidor de la cultura japonesa, debo admitir que me encantan las flores de este árbol, así que decidí crear este adorno a modo de homenaje.
Durante el proceso creativo emplearé tanto materiales reciclados como materiales de manualidades de fácil acceso, lo cual convierte esta manualidad en un proyecto de fácil replicación. Es por ello que si quieres adornar tu casa con una pequeña, pero inmortal rama de cerezo Sakura, te invito a seguir el siguiente tutorial.
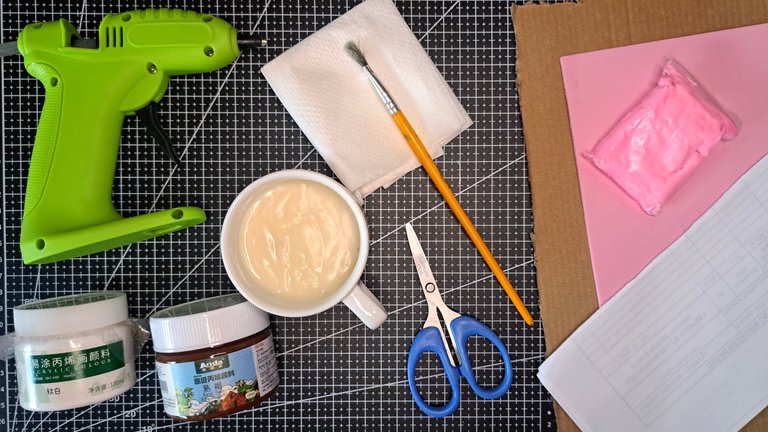
Materials // Materiales
| English | Español |
| ✔️ Plain pink foam | ✔️ Fomi liso rosado |
| ✔️ Pink and yellow moldable foam | ✔️ Fomi moldeable rosado y amarillo |
| ✔️ Recycled cardboard | ✔️ Cartón reciclado |
| ✔️ Kitchen paper | ✔️ Papel de cocina |
| ✔️ White and Carmelite paint | ✔️ Pintura blanca y carmelita |
| ✔️ Flour-based glue | ✔️ Pegamento con base de harina |
| ✔️ Recycled paper | ✔️ Pepel recilcado |
| ✔️ Scissors and paintbrushes | ✔️ Tijeras y pinceles |
| ✔️ Hot silicone | ✔️ Silicona caliente |
Step by step // Paso a paso
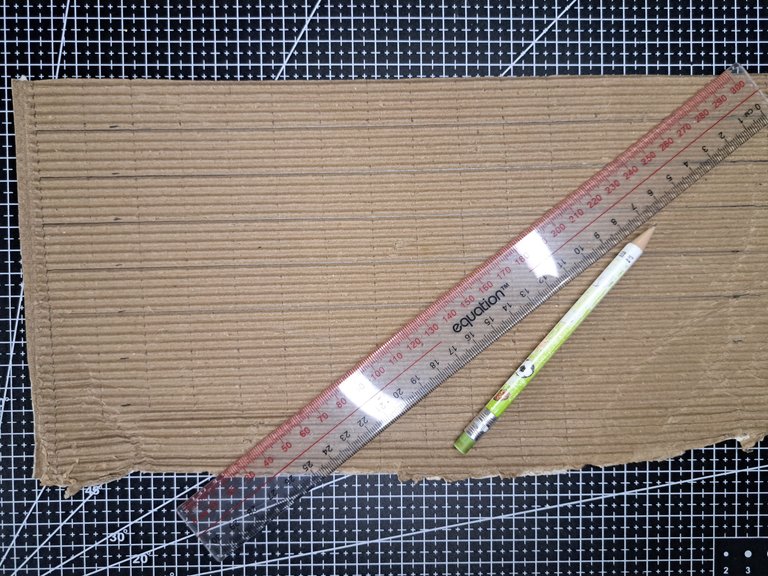
1️⃣ I will start by marking and cutting out the outline of the frame on a piece of cardboard. The dimensions will be 25 cm long and 18 cm wide. For the frame, I will use 2 cm x 2 cm squares of cardboard, from which I have removed one of the sides to expose the corrugated interior of the cardboard.
Comenzaré marcando y recortando la silueta del cuadro en un cartón. Las dimensiones serán 25 cm de largo y 18 cm de ancho. Para el marco del cuadro utilizaré cuadrados de cartón de 2 cm x 2 cm, a los cuales les retiré una de sus caras para exponer el interior ondulado del cartón.
 |  |
 |  |
2️⃣ I will cover the surface of the cardboard frame with kitchen paper and a homemade glue made from flour. Covering the cardboard with paper allows me to increase its rigidity, obtain a texture that is different from smooth, and improve the paint's adhesion. After the paper has dried, I apply a coat of white paint.
La superficie del cartón del cuadro la cubriré con papel de cocina y un pegamento casero preparado con harina. Empapelar el cartón me permite aumentar su rigidez, obtener una textura diferente a la lisa y mejorar el agarre de la pintura. Luego de secar el empapelado, aplico una capa de pintura blanca.
 |  |
 |  |
3️⃣ Once the paint was dry, I glued the cardboard squares around the edge of the frame, alternating their positions to create a fun design. Then I applied a coat of gloss to the cardboard to change its tone, hardness, and color, making it look like wood.
Una vez seca la pintura, pegué los cuadrados de cartón por todo el borde del cuadro, alternando sus posiciones para crear un diseño divertido. Luego apliqué una capa de brillo sobre el cartón para que cambie su tono, dureza y color, quedando como si fuese madera.
 |  |  |
 |  |
4️⃣ Now I will work on the cherry tree branch. I will start by twisting some sheets of paper, which I will stick in the center of the painting, as if it were a tree branch. Then I will apply a coat of brown paint, taking care not to paint the white wall in the background. At this point, I realized that if I had glued the branch first before painting the background, it would have been much easier. Consider doing it this way if you wish.
Ahora trabajaré en la rama de cerezo. Empezaré torciendo unas hojas de papel, las cuales pegaré en el centro del cuadro, como si fuese una rama de un árbol. Luego le aplicaré una capa de pintura carmelita, cuidando de no pintar la pared blanca del fondo. En este paso, me di cuenta de que si hubiese pegado primero la rama antes de pintar el fondo, no hubiese pasado tanto trabajo. Valoren ustedes hacerlo así si lo desean.
 |  |
 |  |
5️⃣ Using the pink foam sheet, I will cut out several 5-petal flower patterns in two different sizes. I will glue the larger ones at the bottom and the smaller ones at the top.
Utilizando la lámina de fomi rosado, recortaré varios patrones de flores de 5 pétalos con dos variaciones de tamaño. Pegaré las más grandes en la parte de abajo y las pequeñas en la parte de arriba.
 |  |
 |  |
6️⃣ In the previous step, I left the tips of the branches free, as I will use pink foam to create small balls that I will stick in that spot. Also, to finish and give the flowers a better finish, I will use yellow moldable foam to create the center of the flowers.
En el paso anterior dejé las puntas de las ramas libres, pues utilizaré el fomi rosado para crear unas bolitas que pegaré en ese lugar. También, para finalizar y dar un mejor acabado a las flores, utilizaré fomi moldeable amarillo para crear el centro de las flores.
 |  |
 |  |
Finished Work // Trabajo Terminado
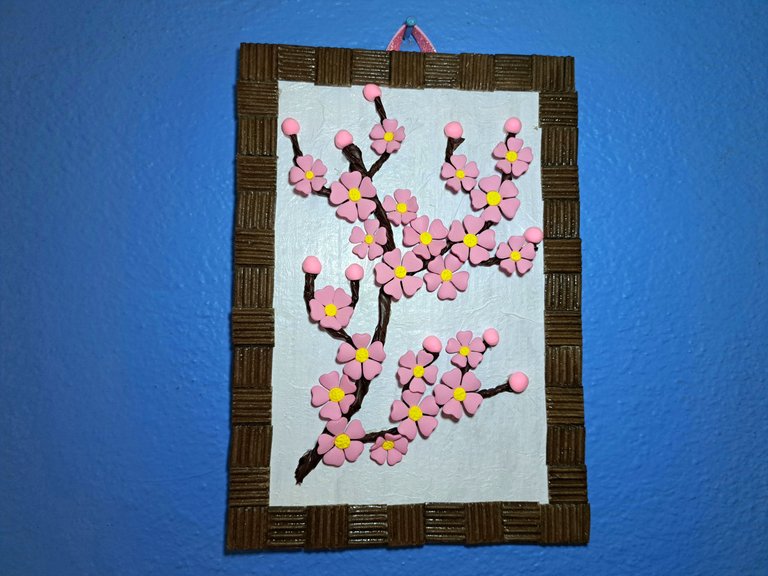
And that's it! Your framed Sakura cherry blossom branch is now ready. I hope you like the result and find this tutorial useful. Before I go, I'd like to mention that you can use any type of hook to hang the frame, as it weighs next to nothing, so you can choose whichever you prefer. That's all for now. See you next time!
Y bueno, así quedaría lista esta rama de cerezo Sakura enmarcada. Espero que les haya gustado el resultado y que les sirva de guía el tutorial. Antes de despedirme, quiero mencionar que pueden utilizar cualquier tipo de enganche para el cuadro, ya que no pesa casi nada, así que esa parte se la dejo a su gusto. Ahora sí, me despido hasta una próxima ocasión.
 |  |

Credits and Resources // Créditos y Recursos
Cover page created in Canva
Translated by DeepL
Images captured with my Samsung Galaxy A53
Inspiration Source


Posted Using INLEO
Te quedo muy hermoso amigo!! Se lo hare a mi suegra de regalo <3
Muchas gracias. Espero que así sea, estoy seguro de que le encantará.
https://www.reddit.com/r/somethingimade/comments/1l7wgy8/i_made_a_framed_artificial_sakura_cherry_tree/
This post has been shared on Reddit by @edeyglezsosa through the HivePosh initiative.
Muy lindo y creativo, queda muy cómo decoración en la habitación 😉