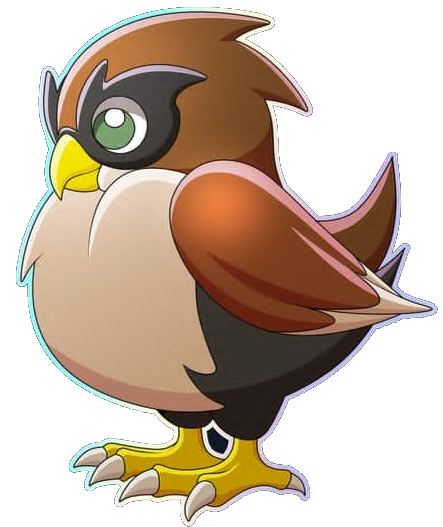
Don't you just "FAL" in love with this cutie?!?!

In my ever increasing list of hobbies that I think by some miracle I will magically have time for all of them... I have picked back up 3D printing and 3D modelling. And to celebrate that I decided to take another stab at using Local AI to take a png image file and converting it into a glb file which I can then convert to a stl and then 3D print it.
But before we dive into this specific post and the outcome... Let's take a look at all my previous Hive/Holozing/Splinterlands 3D prints...
 |  |
 |  |
 |  |
 |  |
Okay enough down memory lane! Now onto the main event!
Generating the GLB file
Once again I use ComfyUI and a pretty simple workflow to take a image and make it into a 3D model.
I decided on Fal because (s)he is just so cute! This is the image I uploaded to generate the glb file from
Here is the entire process in ComfyUI to generate the glb file.

It took 41 seconds from when I hit "Run" until it displayed the 3D model.

And that is all it takes to Generate a 3D model from a 2D image!
Converting the GLB into a STL
In order to 3D print this cute little birdy, we need to take the .glb file and convert it into a .stl file. And to do that I use Blender. You just import the glb file and then export it as a stl. You can make changes to it while you are in Blender if you want but honeslty he was pretty good so I am going to leave it as is and see how it prints!

And I was also pleasently surprised at how clean the backside of the bird was. It usually takes way more fine tuning to get the backside to be clean looking.

Perfect Example is Miu....
Here is what my AI generated for the front...

And this is the backside....

Yeah, not great haha.
But now we just need to export this bad boy as a .stl file which is easy enough!

Now to 3D Print!
I open up Creality Print (because I want to use my Creality K2 Plus for this print even though I am going to print it in 1 color).
Import the stl file we created in the last step and it will look something like this:

Now we could just slice this plate and print it, but I wanted to try to see how well I could paint the surfaces to see if it is even worth the effort to multi color print this one.
(and yes... there are a ton of manifold edges... you can fix that in Blender but the Slicer software does a great job of it and so I leave it to the Slicer to fix those)
... yeah I say we just stick to 1 color and then paint it by hand after the fact haha

After slicing the plate....

It is estimated to take 3 hours and 42 minutes to print it.
It will take 96.94 grams of filamanet (which includes the 21.57 grams used just for supports).
Based on what I put in for the cost of 1kg of PLA, it will cost $1.94 to print this Fal 3D model.
You can even view the print job layer by layer to see the insides of it 😀

Now we wait 3 hours and 42 minutes!
Here is the timelapse of FAL being printed!

The Finished Product
Fresh off the presses here is FAL!

Cleaned up the supports and here he is.

His underside could use some work though 😬

Post Processing
Let's remind you all what FAL is supposed to look like though
So I decided to start painting! And I am not a artist by any stretch of the imagination!


And here he is in all his glory!


His chest could use some work... but it is what it is.
And look, the paint and brushes I used are all from a Dollar Store... so that is why my painting sucks and not because I just suck at painting... 😉
This was a spur of the moment idea and thus article about Holozing and me 3D printing. I hope you like my little cute Fal guy.
The 3D Model Files + Legal
Look, I am not sure how all this legal shit works. I didn't create the FAL character/creature. So I am "borrowing" the starter image and using AI to generate a 3D model from that. I do know that under USA law, I am allowed to do that and print my own 3D Model of the character and share images of what I made (I think this goes under the "Fair Use" policy).
But what I don't know is if I am allowed to share the files with you all. So I put a request out to my good old friend @acidyo to see if he is okay with me sharing the stl and Blend files with you all so that you can 3D print your own FAL guy. I haven't heard back yet (hence why I am pining him here too, sorry bud), so I am going to assume the answer is NO just in case. If he does respond and tell me that it is okay to share the files with people and/or upload them to like MakerWorld, CrealityCloud, Printables, then I will do that.
If you want the files though, just leave a comment stating that and if I hear back and am allowed to share them I will send you a Google Drive link to download them. No promises though since this is not my original work
Hey if you are still reading then I want to tell you that I run a Hive Witness Node. I run it because I want a decentralized blockchain and that means even the little guys can contribute to the blockchain and it's not all controlled by a few accounts.
If you want to vote for me I would appreciate it.
If you don't want to vote for me... that's cool to!
 |  |
|---|
For simple painting like this any brush will do, but even a small upgrade to something better could make the painting process a lot more fun. At least in my experience.
Also this turned out really cute...and the back of the cat was really not. lol
For some reason my images were duplicated at the end of the post. I updated them so you can see it's rear end better 😁
I was meaning this image

Do you sand or do anything else to smooth stuff out? I know there's stuff that you can use that fills the gaps.
OHHHH bahaha yeah that one was ugly as %#@$.
If I was good with 3D modelling and Blender software... I would fix it digitally.
But yeah you could sand it and fill holes and stuff after it is printed. I just use a type of Woode Filler when I do that.